In this part of the course, we will finally start with actually music theory. I will explain notes, and the basics of music notation. I will show you some normal notation, so you can get the more “classic” idea, but beyond the we will be focusing on presenting music theory using MIDI stuff :).
Remember that you can download source files for this course, and you’ll find a link in the first part of this music theory for computer musicians course.
1. Music Theory for Computer Musicians
What is music theory? Well, it’s knowledge about all the building blocks of music.
Consider these building blocks to be toy bricks that you can use to build anything you want (a music piece). Music theory teaches about various “bricks” you can use in your creations. In some ways, music theory is also about learning how to put these bricks together (and this is called music composition).
But music composition is often taught separately, and I will continue this tradition here, so in this book you will simply learn about the building blocks of music.
There are many such blocks. For example, we have notes, intervals, or scales and chords.
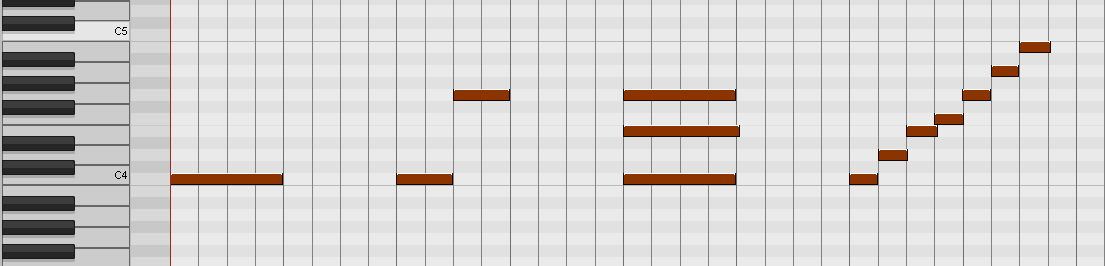
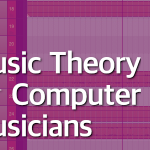
Figure 1.1
Take a look at figure 1.1. The first “block” on the left is a lonely note C4 – it’s a note C in the 4th octave/register. All the other blocks are notes, too. Remember that in a package for this book, you will find most of these images in MIDI form so you can load them to your DAW and test them by yourself.
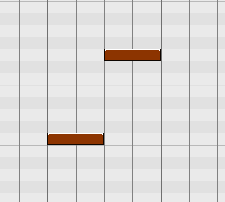
Figure 1.2 – An interval.
Figure 1.2 shows a difference in pitch between two notes – this difference is called an interval – it’s the vertical distance (pitch distance) between two sounds. One is higher than the other. This is another building block of music.

Figure 1.3 – A Chord
Figure 1.3 shows three notes played together – any two or more sounds playing together are called a chord, and chords are another building blocks we will learn. Chords are used to build harmonies – consider them as something that builds the emotional depth of your music.
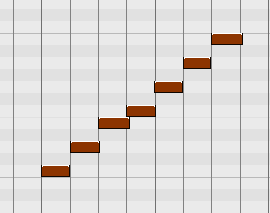
Figure 1.4 – A music scale
Figure 1.4 shows a couple of notes following each other – this is a scale, based on which we can make music. We use the notes of a scale to build melodies. In case of figure 1.4, we see a C Major scale, which means this is a “major scale in a key of C”.
After finishing this guide, you will gain basic knowledge about all these building blocks of music. How to use them to actually compose music, well, this I will discuss in another guidebook.
This guide focuses on showing you music theory in practice (by offering you MIDI files), but also it is meant for computer musicians that means people who make music on a computer. Thus, I will focus on explaining music theory based on DAW programs and MIDI grids, and at the same time I will skip classic music notation whenever possible.
That said, I encourage you not simply to read this book, but also to practice things you will learn.
One more thing: learning theory is one thing, but understanding theory is another thing. The best way to understand music theory is through practice, so if don’t understand some things written in this book at first, don’t worry. Take your time, start making music and try things in practice, and with time, everything will become easier. Some things simply require you to actually make music, before you suddenly understand them.
In the next few chapters, you’ll learn the three primary elements of music:
- Rhythm
- Melody
- Harmony
Instead of discussing music composition, I will discuss these elements from pure theoretical perspective. I will discuss rhythm by discussing the length of notes, pauses or the idea of time signature. I will discuss melody by explaining the intervals, and I will discuss harmony by talking about chords.
This way you will discover three dimensions of music – the vertical dimension of pitch and melody, the horizontal dimension of time and rhythm, and the depth represented by harmony, offering our music some emotional content.
The Notes
The basic element of music is a sound, which is represented by notes.
Notes are sounds represented by specific symbols that we call notes. A note is a graphical representation of sound.
Figure 1.5 shows an example of classic music notation for notes.

Figure 1.5
On figure 1.5 you can see a couple of notes written on a staff. All these notes are exactly the same you’ve seen on figure 1.1 when they were pictured on a MIDI grid. From the left, you see the half note C (half note tells us that this note is half the length of the whole note). The three half notes stacked one above the other are a chord, C Major. Finally, we have a couple of 16th notes following each other, and this is a C Major scale.
Useful Tip
MuseScore is a popular and free software to create classic music notation and you can find it on https://musescore.org – it has a lot of features and it also allows you to save your music in MIDI format (yep, from staff to MIDI) so you can open your scores in a DAW to orchestrate them.
On figure 1.5, on the left, you can see a symbol – a treble clef. Next to it you see digits 4/4, and this is called a meter, or time signature. Meter is a way to divide the song into smaller pieces called bars. The 4/4 meter tells us that our track is divided into bars in which every bar contains four quarter notes. I’ll explain this in details soon.
Useful Tip
DAW programs do not display clefs. The vertical piano roll displays all possible registers, from subbass to highest possible pitches, and often it displays digits next to note C, such as C3, C4, C5 etc, to tell you which register you’re looking at.
The staff is a classic way to notate music and it is used by musicians to this day for a simple reason: it works very well. But if you make music on a computer, you don’t have to read classic notation (great news for hobbyists!) – you can create music simply by using a MIDI grid. That said, if you do learn how to read music, you will benefit greatly, because most educational resources available these days is written in a classic format, so you will have easier time learning.
The vertical lines between the notes on figure 1.5 separate bars from one another.
Music made on computer usually utilizes a MIDI grid, so for the purpose of this book, I will show notes and other building blocks of music using the MIDI grid instead of classic staff notation.
MIDI Grid

Figure 1.6
Figure 1.6 shows a MIDI grid in a DAW program.
On the left side you see a piano roll – this is a standard element in all MIDI editors. It’s a MIDI keyboard, like the one on a real piano. Each of the white and black keys represents notes. These are the notes in different registers/octaves. An octave is one of the music intervals, but also it’s a term used to describe a collection of 12 chromatic notes.
The grid itself is divided into lighter and darker rows. The lighter represent the white keys and darker rows represent the black keys.
At the top of the MIDI grid, you see how everything is divided into bars. On figure 1.6 you may see digits 2, 2.2, 2.3 and so on. These are bars, and they are divided into smaller pieces as defined by the meter. All the lines intersect each other, thus creating a grid.
For now, just remember that the thicker lines represents bars. The thin lines represent the meter. In one of the coming lessons you will learn that this grid actually tells us a lot of things about the length of the notes. Then, everything should become a lot more clear.
Seven Notes
There are seven main notes.
These are: C, D, E, F, G, A and B. Figure 1.7 shows these notes on a MIDI grid.

Figure 1.7
The basic musical scale is the C Major scale, shown on figure 1.7. This scale begins with note C.
Seven notes and an additional eighth note create an octave. This eighth note is again a note C, but an octave higher. An octave is also a name for an interval – a distance between two notes measured in number of semitones. Later on you will learn a lot about the intervals and semitones.
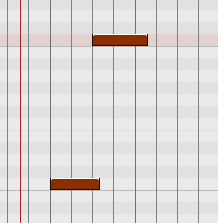
Figure 1.8
On figure 1.8 the distance – the interval – between the first note C and the second note C is exactly an octave. Count all the rows – the second note C is placed 12 rows up when counted starting with the first row above the very first note C. These 12 rows are 12 semitones, and we count intervals with semitones. Later on you will learn how to count semitones and intervals.
Full notes, represented by white keys, that is: notes C, D, E, F, G, A, B, are either a semitone or two semitones apart. Two semitones happen when there is a black key between the white notes, and one semitone happens when there is no black key between the white notes. We can also create additional five notes with semitones, so called “chromatic notes”, that is notes with either a # (sharp) or ♭(flat) symbols. A sharp makes the sound higher in pitch, and the flat makes the sound lower in pitch.
For example, figure 1.9 shows the note C as the one on the very left.
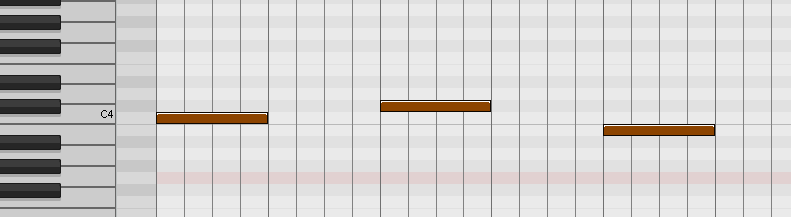
Figure 1.9
The middle note on figure 1.9 is C# – C sharp. It sounds a semitone higher than normal note C. The third note, the one on the right, is C♭, also written down as Cb – it’s C flat. It sounds a semitone lower than note C.

Figure 1.10
Figure 1.10 shows how chromatic notes look on a staff. This time we have a note A on the left, A sharp in the middle, and B flat on the right.
Most of the notes can be changed into chromatic notes, making them higher or lower in pitch. Notice that in Reaper, in the upper left corner, you can see a small field in which the name of the note is displayed when you point it with your mouse. Beginners will find this very useful. Other DAWs may have similar function somewhere on the screen.

Figure 1.11 – Reaper showing a note D5 as highlighted with a mouse.
On a real piano, full notes are played by white keys, and chromatic notes are played with black keys. Similar situation occurs on a piano roll.
Thus, we have seven white notes and five black notes – twelve notes in total. All western music is made of only these twelve notes.
Here’s where thing get tricky – notice that if you lower the note C a semitone down using a flat symbol, you will find yourself playing note B – a while key. There is no black key between notes B and C.
Note Cb (C Flat) is, in reality, a note B – this situation, when a single note can have two different names, happens a few times on a piano roll and we say that these notes are enharmonic. So how do we know whether a note should be called Cb, or B? This depends on the context – what scale are we using and what chord are we using. Just know that if you have a scale, you can’t have the same two notes in a scale. If a scale contains A and A# notes, you need to change them to A and Bb, because you can’t have two A notes in the scale. If you’re a beginner, don’t worry about this too much, just remember that notes can be enharmonic and that this phenomena simply happens.
For now just remember that in total, we have 12 chromatic notes. Try to count all the keys starting with note C and going up to note B. You will get 12 keys.
Now you know the notes. Let’s recall: we have C, D, E, F, G, A and B, as well as chromatic notes between them as sharps or flats. In total, these notes make the chromatic scale – the basis for western music.
The vertical axis on the MIDI grid represents the pitch of the note. The higher up the axis, the higher the sound.
The cbass_violins.ogg file for this book contains a recording of two D notes – the first one is low, played on a bass, and the second is high, played on violins. Still, they are the same notes, just in a different register/octave.
Music is made of two dimensions of sound: the melodic sounds that happen one after another which can be perceived as horizontal sounds, and vertical sounds of harmony that are played at the same time, creating chords, thus creating emotions of your music. By creating music, we simply work with these elements, playing all of them in a given rhythm.
Note Value and its Length
The first axis, the vertical one on the MIDI grid, is the pitch of the sound and is easily recognized when looking at the piano roll. The second axis is the horizontal one and it is the time axis.
It represents the time dimension of your music and the length of the notes. In MIDI editor, the longer the note, the longer it is played.
Now you need to understand that your music is divided into bars.
A bar is a unit of measurement in music. Take a look at a time scale in your MIDI editor. You should notice digits and numbers, like on figure 1.12.
Figure 1.12
The main numbers represent bars, and each bar is then divided into even smaller pieces. Figure 1.12 shows bars 9, 10, 11 and 12.
Dividing your track into bars, and dividing bars further, helps us understand the idea that we also have notes of different length: whole note, half note, quarter note, 8th, 16th and so on. These are the values of the note.
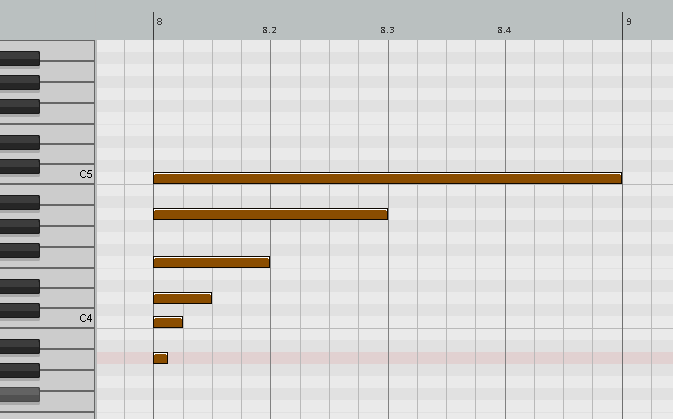
Figure 1.13
Figure 1.13 shows notes one above the other. From the very top, we have:
- Whole note. Here it plays through the entire bar.
- Half note. It’s half the size/length of the whole note.
- Quarter note. It sounds half the length of the half note and ¼ of the whole note.
- 8th. 1/8 of the whole note.
- 16th. 1/16 of the whole note.
- 32nd. 1/32 of the whole note.
On a staff, each of such notes has its own symbol, like on figure 1.14.
Figure 1.14 – From the left: whole note, half note, quarter note, 8th, 16th, 32nd, 64th and a pause symbol.
Notes can also have a non-standard length. On a staff, we can make the note longer by placing a dot behind it. Such dot makes the note longer by half of its length.
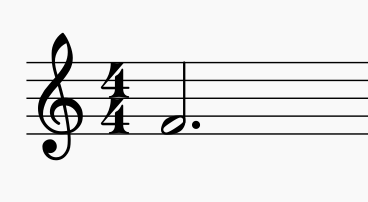
Figure 1.15
In case of MIDI editor, you simply make the note longer or shorter, by dragging it left or right with a computer mouse.
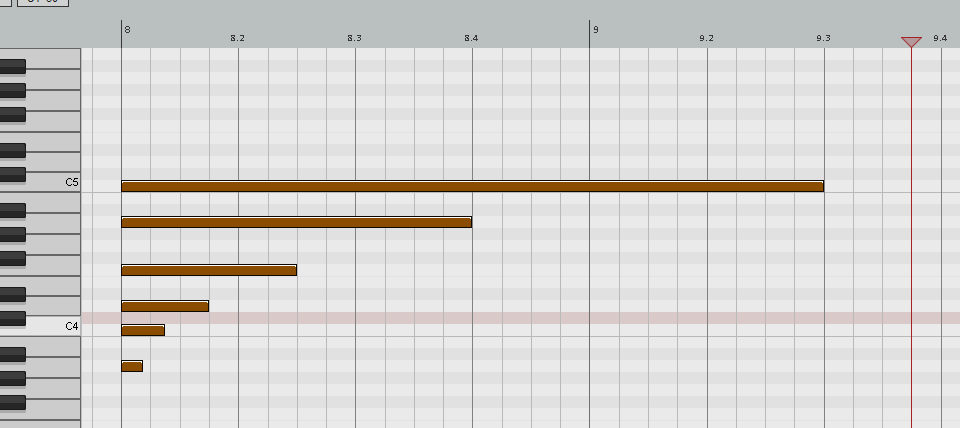
Figure 1.16
Figure 1.16 shows multiple notes that are now longer by half their length. So if the whole note C is an entire bar long, then traditional dot should make it a bar and a half long. Of course, this is just the standard “lengthening”, and if you want, you can make the notes longer or shorter in any way you want to fit your composition.
Pauses in Music
Sound is not the only element of music – silence is also used, and it is represented by pauses. In classic notation for every note symbol we have a pause symbol, too. This is because for every whole note there is a whole pause, for every half note there is a half pause and so on. Figure 1.17 shows the same notes as in figure 1.14, but the notes are now pauses.

Figure 1.17
A pause is simply a moment in your music, when the instrument does not play. While in case of classic notation you need to indicate a pause with a special symbol, like one of the symbols from figure 1.17, in MIDI grid you simply place no notes, and the instrument will remain silent. The empty places between notes on figure 1.18 are pauses – the silence between the sounds.

Figure 1.18
Based on the files for this book, “listen” to pauses of different type.
You can make pauses of any length, just as you can do so with normal notes.
The length of the note and pause is always related to the length of the whole note – but how many seconds is the whole note? Well, in reality, the length of the note is never defined this way. The length of the whole note is defined by tempo and by meter. These are two concepts that we will explain how.
Tempo in Music
Tempo is measured in beats per minute. 120 BPM is an example of a tempo, where BPM stands for beats per minute.
You can listen to some examples of a tempo by listening to a metronome, a simple tool available in every DAW. Usually, you just need to enable a metronome and hit “play” button in your DAW, and you will hear “ticking”. In Reaper, all you have to do to change tempo is to type a new value in a field below “BPM” at the bottom panel, like on figure 1.19, where it says “120”.
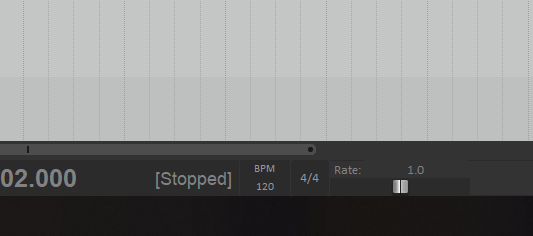
Figure 1.19
At the top panel of Reaper, you will find a button to enable metronome. After enabling it, hit the “play” button and you will hear ticking.
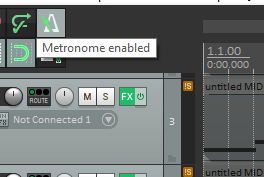
Figure 1.20
First, just play the track with standard 120 BPM settings. Next change the settings to:
- 160 BPM
- 80 BPM
After each change, play the track again and hear as the ticking gets faster or slower, based on different settings.
Tempo can take various values – like 140, 74, 53, 88 – you can have any tempo you want for your music, as long as it makes sense to you and your listener.
Changing tempo affects how long each bar of the track is played. With lower tempo, the bar is played longer. With faster tempo, the bar is played faster. This of course affects how long (in seconds) we play the whole note and all the other notes. Is that all?
Not really – now it’s time to learn about the meter and rhythm. But before we do, take a look at a quick video showing some of the things we talked about today.
Don't forget to become a fan on Facebook and subscribe to new posts via RSS or via email.