Before we proceed to actually creating our first orchestral track, I want to show you how to create a very simple piece of music, just a couple of seconds long. This tutorial will show you the absolute basics of working with a DAW, a MIDI editor, and composing.
3. How to Create a Simple Piano Track in Reaper
In this chapter, you will learn how to create a simple piano track from scratch. Nothing too fancy, just some 8 seconds of music. It’s not about the track itself, but the skills you will learn in the process. I will cover everything from creating a single MIDI track in Reaper, loading up Kontakt sampler and a piano library. Then, we will discuss the absolute basics of chords and harmony, and we will create a melody.
As such, this tutorial is meant for total beginners who are just starting out, and there’s no better way than practice.
Creating a Track in Reaper
For the purpose of most of my tutorials, I use Reaper, because it’s a multi-platform, easy to use, affordable DAW. You can download it for free, and the trial version can be used without charge for 60 days (obviously for evaluation and personal use).
Of course, you can use any sort of DAW, but then you will have to figure out some things by yourself, such as where are some functions and buttons located. Don’t worry though, all DAWs use the same things I will explain in this tutorial, they just may be located in different places or look differently.
Anyway, if you go with Reaper option then go ahead, open Reaper. You should now see an empty workspace.
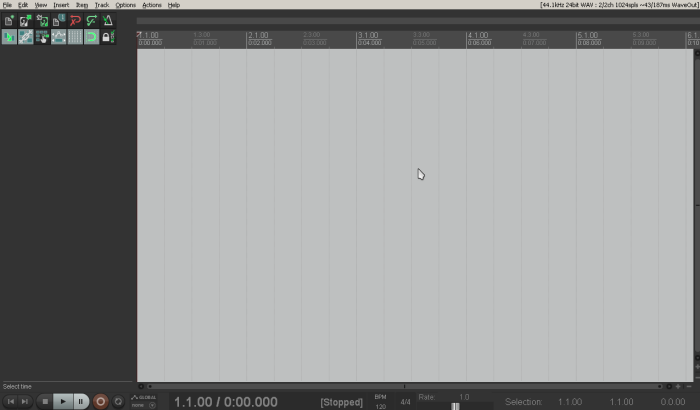
Figure 3.1. Reaper – empty workspace.
The first thing to do is to create a track. Just double-click on the left dark area, and this will create a single track which will appear on the left sidebar. Or you can right-click on that left column, and click “insert new track” from the menu.

Figure 3.2. A new track has been created. I typed the name, “Our first track” :).
It’s time to create a midi track. Let’s make a selection first. Look above the workspace, but below the menu – you should see a scale. Basically, each main number represents a single bar. Click on the workspace, near the first bar, and while holding the mouse button, select the area up to the fifth bar. Release the mouse button to create a selection.
Figure 3.3. New selection.
From the top menu, choose “Insert”, then “New MIDI item”. A small midi box will appear within the workspace.
Figure 3.4. First midi item, a midi box, is ready.
This small box is now full four bars long.
Loading Kontakt Sampler
Now that we have a track workspace ready, we can load Kontakt, a sampler that allows us to add instruments. Please note that there are two versions of Kontakt Player, one that comes with full version of Kontakt 6, and one that is free, but has 15-minutes time limitation for some instrument libraries.
There are many samplers on the market, but I use Kontakt since it’s most popular and most versatile for the kind of music I’m making. You can go ahead, and download a free version of Kontakt player.
On the control panel of your track (on the left) you can see a couple of buttons. It doesn’t matter what they all do right now. For now, we just need to use one of them, the FX button.
Click it, and a new window will appear, like on figure 3.5. This button allows you to load various plugins. Kontakt can be used as a plugin, but there are many more plugins out there – most of them are used to process the sound. In Reaper, the left column of this new FX window displays all loaded plugins. The right area shows you all the plugins in your library.
Please note that this chapter does not cover how to add plugins and Kontakt to your VST library – this should be explained in your DAW’s manual.
Type “kontakt” into the filters field, and then, select Kontakt (8 out for now), and click OK.
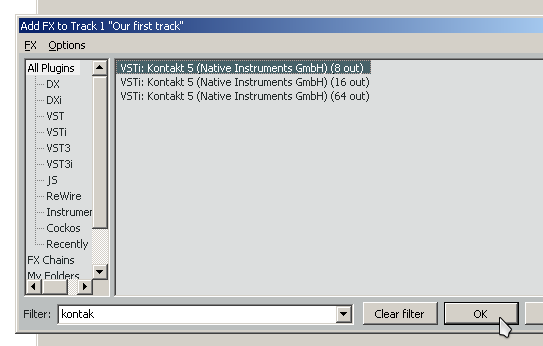
Figure 3.5. Add Kontakt as FX to our track (as you can see, Reaper has a very spartan-like interface, but it gets the job done).
This will load Kontakt into your FX window. Note that I’m using Kontakt 5, but there’s already Kontakt 6 on the market.
Loading Instruments
So far, so good. Now it is time to load an instrument library. As you should know from other sections of this book, instrument libraries are collections of pre-recorded short samples that with proper programming can simulate an instrument.
For the purpose of this tutorial, we will load a single piano instrument, “VSUpright v1”, which is available for free: http://vis.versilstudios.net/upright-1.html#sysreq. If you’re already an experienced piano player and you seek a way to just compose great mockups, and you’re here just to learn how to use the software, then I recommend you download “Piano in 162” by Ivy Audio: http://ivyaudio.com/Piano-in-162. It’s a huge, and powerful piano instrument.
Useful Tip
If you don’t have Kontakt yet, you can try free DSK piano plugin, The Grand, available here: https://www.dskmusic.com/dsk-the-grand/ (both for Windows and Mac). It’s a stand alone VSTi (virtual instrument) that does not require Kontakt sampler.
In your Kontakt, look on the upper left corner, and you will see a Kontakt logo, and tabs below. Click the “files” tab and navigate to the folder, where you unpacked the VSUpright. Navigate further, to Kontakt instruments, and load the K5 patch, either by dragging it into main Kontakt workarea (black on the right), or double-clicking the patch name.
The patch is just the name of the file you will see in the browser (left column, bottom).

Figure 3.6. Loading the patch.
Figure 3.7 shows what the instrument looks like after loading. Different instruments have different interfaces that are described in their manuals (most well-made instruments come with instructions).
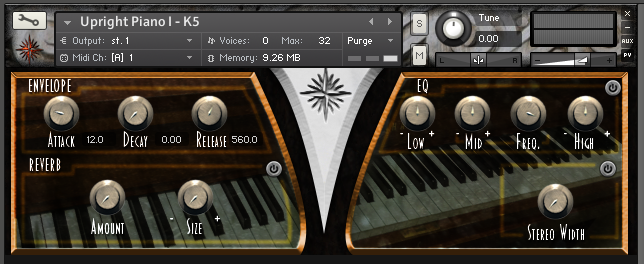
Figure 3.7. Free upright piano instrument loaded. Don’t worry about the settings for now.
Useful Tip
If you’re using free Kontakt Player, this instrument will work only for 15 minutes (this is the limit for unofficial instruments used with free Kontakt Player). But that’s enough to start. That said, free Kontakt Player comes with Kontakt Factory library in demo version so you should find some nice piano instruments there, too.
Our instrument should be now loaded into Kontakt. As such, now it can be used to make music.
Making Music
It’s time to make some music. Close the Kontakt/FX window, and double-click on your midi box. This will open the midi track editor.
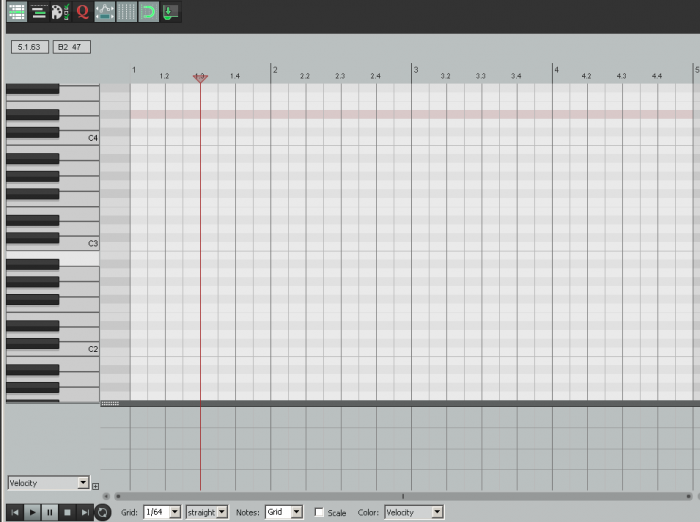
Figure 3.8. Midi editor in Reaper.
Consider the X and Y axis. The Y axis is vertical – as you can see on the right side of the editor, there are piano keys there (called a piano roll), from the lowest octave to the highest. The X axis is horizontal, this defines the time. Basically, down-up means pitch of the note, and left-right means duration of the note, and the duration of the musical piece itself.
Now we want to create music. For this chapter, don’t try to improvise, just follow me :). We’re learning basic skills here, not the art of composing.
To make a basic song, I will use the default settings – this means I will use the 120 BPM as tempo and 4/4 as time signature. These are default settings for Reaper.
You have four bars at your disposal now, bars 1-4, because this is how big selection and therefore midi box we have created earlier. In this tutorial, we will stick to this basic structure.
Let’s Start With Chords
To create a simple song, we can create a very simple, very basic chord progression. Chords are sounds that are played at the same time and sound well played together. For this song, we will use a very common and simple chord progression using triads – chords that contain three notes. I–V–vi–IV progression is very simple and very popular. We will base the track on C Major scale, a very simple and basic scale, build on white keys on the piano keyboard.
Chord progression is just a couple of chords following one after another as the song progresses. The rest depends on the musician and composition, but often, entire tracks are based on a few main chords. I will explain this in another article.
Let’s start with the first chord. Each triad is made of three notes. The root, the third and the fifth. The root is the main note of the chord, the third is the note that is an interval of third apart, and the fifth is the note that is an interval of fifth apart. Intervals are explained in another article.
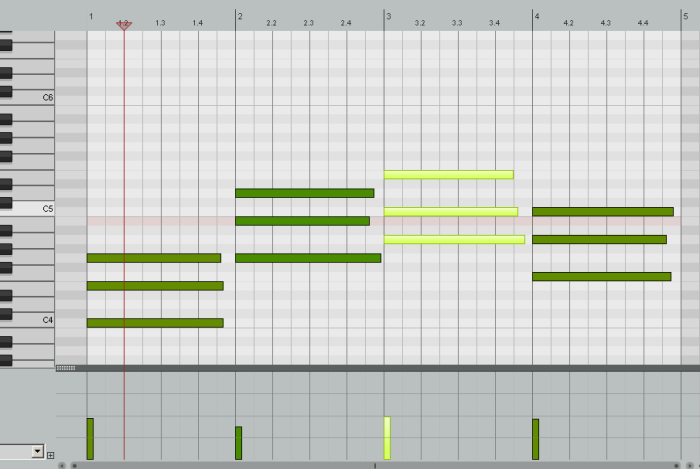
Figure 3.9. Our basic chord progression.
On the image above, you see: the piano roll on the left, so now you know we work on octaves 4th and 5th (based on the labeled keys like C4 or C5). You see four bars of music (notice the top scale in your midi editor). And on the bottom, you see the midi velocity control, which controls velocity – this is the bottom panel, with vertical columns, third of which is highlighted. Velocity is one of MIDI controls which basically tells the sampler how hard or how soft the note is played. We use velocity to create realism of our tracks.
Add some chords to your track. If you’re an experienced piano player, you may want to just play the keyboard and record everything, but since this is a tutorial for total beginners, I will focus on using the mouse :). Basically, left-click on the grid where you want note to be placed, and then drag the note to set its length. For now, you may notice that your notes are very red, not green – that’s because of velocity, and I will explain it later, so stick to redness for now :).
Thus, create the following notes by clicking and dragging them, so they a little shorter than an entire bar: C, E, G. And now you have created a C Major chord, our tonic.
Then, create the other three chords:
- G, B, D
- A, C, E
- F, A, C.
Now we have four different chords. And that’s our chords progression.
Create a Melody
Now, let’s create a melody. We will base it upon lead notes from each chord, so the melody will stand out. This is what I came up with, the notes are: C, D, E, B, A, B, C, F, E. I have highlighted the melody notes. You can select group of notes by right-clicking and dragging a selection with your mouse.
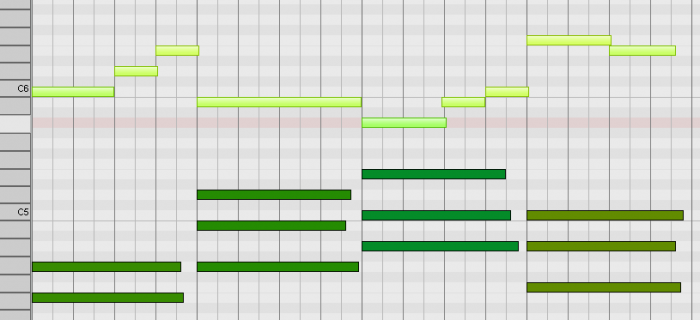
Figure 3.10. Simple melody based on chords.
What you have now is a melody that is harmonized with chords. Chords create harmony. These are two keywords you don’t have to worry about right now, but you should remember them nevertheless, because they will become more and more important over time, as you progress with your musical education.
One more thing: you should know this from music theory, but basically, we create music by using only the notes from the scale we have chosen. These are diatonic notes – notes from the scale. Notes outside the scale are called non-diatonic notes. Yes, you can create music with non-diatonic notes, but this is a bit more advanced, so don’t worry about that.
Another thing, notice that the first notes of the melody are the same notes used in our chords. This is the basic way to build melodies upon chords (and vice versa), also great for beginners. For example, our first chord is C Major, and the first note of the melody is C. But on our second chord, we have the B note in melody, while in the chord, the B note is the third, not the root. That’s OK too, because it harmonizes nicely :).
By now, if you never studied music theory, you probably understand why I said you should do this. At least read “Music Theory for Dummies”, and this will help you a lot! This is the book I started with.
Let’s Add Bass Line
Bass line won’t be any fancy here. We will just double the root notes of our chords.
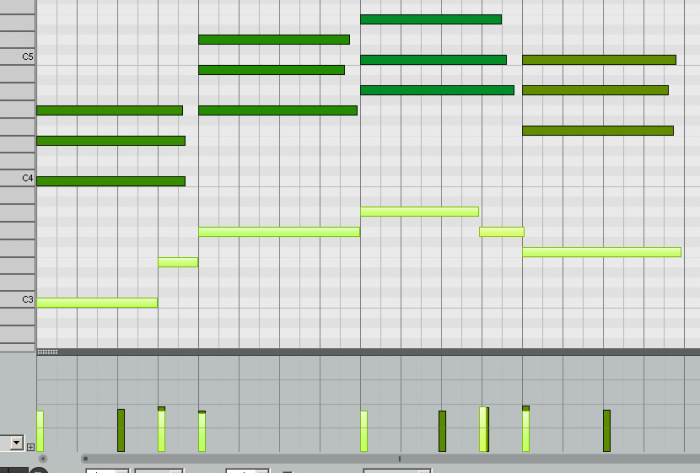
Figure 3.11. Bass line.
So we have C, G, A, F. I’ve also added these short quarter notes, E and G for bars 1st and 3rd. This way, there’s something more going on in our bass line. And that’s it, we have our very basic track.
Let’s Humanize
We have a melody, a bass and the chords, but making music on your computer requires something more. We need to make the music more realistic. Making your computer music realistic is a complex subject, but since this is a basic tutorial, we will just focus on one of the most important and basic tools: velocity settings and timing.
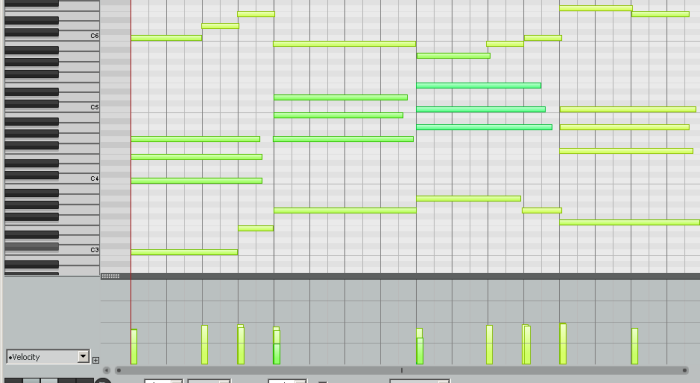
Figure 3.12. Our entire “song” :).
Think of velocity as of the settings that tell the virtual player how hard to punch the keys or how hard to blow the trumpet. The higher the velocity, the louder and more aggressive the sound. The lower the velocity, the gentler and weaker the sound. On the bottom left corner, you see a menu, which allows you to select what kind of midi data you want to edit. Click it and select “Velocity”.
Useful Tip
Not all libraries support different velocities, especially the free ones can lack this functionality. But most paid libraries do use velocity controls.
Basically, you can click a single note, and on the bottom of the midi editor, you will see its velocity column highlighted. Click and drag it up or down to change the velocity setting. Or you can select multiple notes, and edit multiple velocity columns the same way. Play around :). Try to get all the notes to “yellowish” green and green.
Then select all the notes, like on the image above, and press “H” on your keyboard.
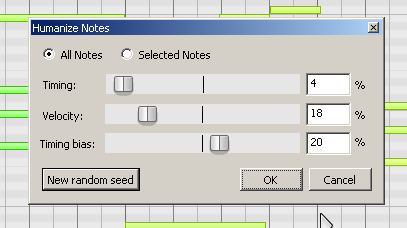
Figure 3.13. Humanizing notes.
Figure 3.13 shows the humanization settings. Change your settings to match my. Basically, you’re interested in two things:
- Timing: which randomizes when the notes are played. Basically, they can be played a little bit sooner or later than you’ve put them in your midi grid.
- Velocity: which slightly randomizes the velocity of your notes.
Humans are not perfect, and thus by randomizing our notes, we can achieve a greater realism of our track.
That’s it.
Summary
This completes the tutorial. You have learned the basic skills that you will use all the time from now on to work on computer music. Most of the things I’ve shown above, if not all of them, are present in all DAW programs, whether you’re using Reaper, FL Studio, Cubase or something else. It’s there, you just have to find it.
Don't forget to become a fan on Facebook and subscribe to new posts via RSS or via email.