In the previous tutorial, you’ve learned how to create a simple piano piece in Reaper. Today we will discuss composition for a few paragraphs, and then we will, at last, jump to making our epic tutorial track! We will create a chord progression, upon which we will build our orchestral piece. Let’s get started.
Watch the video for this tutorial:
The Compositon Process
Before we go to the actual composition process of our tutorial track, let’s talk a bit about the process of making the entire track, before we actually make it. Everything starts with composition. For composition, I always recommend loading a piano patch, because when you compose with a piano, you clearly hear everything you do.
Of course, we can skip the piano composition, and compose everything with different instruments. This can work, too, so don’t worry. The track I’m teaching in this book has been composed this way.
There are two ways to compose music – you either start with a melody, or you start with chords. Trailer music is a specific genre, and as such, we usually start with chords, building simple melodies upon them when necessary. And in this book, we focus on a simple track that I consider an orchestral trailer piece.
Orchestral composition requires us to orchestrate everything for various instruments. Trailer music uses two primary layers:
- Orchestral layer – with all the orchestral sections, these are real instruments, usually playing melodies and chords.
- FX layers – with hits, booms,impacts, risers and so on. Consider them special effects that add “life” and “trailerness” to the entire track.
Orchestral layer is exactly that what the name suggests: we’re using orchestral sections here:
- Strings – violins, violas, cellos and basses.
- Brass – trumpets, horns, trombones, tubas.
- Winds – flutes, oboes, clarinets, bassoons.
- Percussion – timpani, snare drums, toms, cymbals.
- Choir – male and female voices.
There is no requirement as to what to compose first. You can compose the orchestral layer first, and then add the FX, or you can compose both layers at the same time. Or you can even start with the FX, and move from there.
Orchestral composition should be limited to three layers:
- Harmony – based on chords, and we can support with with arpeggios and ostinatos.
- Main melody
- Countermelody
“Epicness” is achieved not by complexity of the layers, but through orchestration of simple layers.
After the entire music is composed, we start mixing it. Mixing generally includes:
- Setting volume levels – so called “leveling”, so that everything sounds good together.
- Using plugins: EQ and compression – to glue everything together, clear unwanted things such as mud, and flatten everything, so that the entire track is well balanced.
- Using reverb to add the depth and epicness to the entire piece.
By the way, trailer music is often flatten – we accomplish this by using compression. This generally means that the difference between the loudest and quietest sound is quite small. Later on, I will show you a waveform of both uncompressed and compressed piece, so you understand what this means. But I mention this, because I want to clarify that not all types of music are compressed in the same way, or compressed at all. It all depends on the genre. Sometimes, music is compressed only a little bit, and sometimes, there is no compression at all. Personally, I do not like to use too much compression on my orchestral music.
Finally, everything is rendered into final files in specific format, such as MP3 or WAV. Here is a tip of the day: when rendering, don’t forget to save the actual DAW and MIDI copies of your track. I mean, save the track in the DAW format (for Reaper, it’s and .RPP), and in MIDI format, .MID. If you ever decide to make changes to your track, you will have the source files to do so.
Trailer Music Form
This book talks about simple trailer music which is a great way to start learning about virtual orchestral and epic music, so let’s take a closer look at the form of this kind of music.
Most beginners struggle with setting up their music tempo and time signature. So here’s a tip for beginners: most trailer tracks are written in 4/4 time signature. Use on of the following tempos (in beats per minute, or BPM): 80, 100, 120, 130. Experiment with these, and you will make a lot of great tracks.
I’m pretty sure you’ve seen a lot of trailers in your life, especially if you’re reading this. So you know they can last from a minute to two minutes. So try to make your trailer music this long.
This is the basic form idea for trailer music:
- Intro – something to start with.
- Build-up – introduction of more complex ideas.
- Climax I – expanding the build up.
- Climax II – expanding the climax I again, and introducing the final melody.
- Outro – calming dawn in a dramatic way.
This idea can have various forms, but in trailer music, we usually use the AAA form. This means we build the track upon the same piece repeating over and over again, but changing it ever so slightly.
Between the build-up, and climaxes and so on, we may (or may not) introduce pauses for dramatic effects. The main track from this book doesn’t have these, really, but I include explanation of such dramatic pauses in few more of my tracks in a separate subchapter.
Trailer music is often ignoring the perfect realism, sacrificing it for the sake of huge sound. That doesn’t mean you don’t have to strive for realism, or that you can get crazy. It’s more about balance. For example, when composing for real orchestra, a composer must remember the physical limitation of the players. For example, brass players cannot play indefinitely – they need to breath. If you forget about pauses in your computer music for brass section, it won’t end the world in your epic trailer piece, but at the same time, it won’t be very realistic. So try to seek balance.
Good, now we can get to work!
4. Composing Epic Music
All right, it’s time to get practical! As promised, this book is one big tutorial, in which I will guide you step by step and note by note through production of an orchestral trailer track. I composed the piece, I wrote it down, then I recomposed it following my own tutorial to make sure it’s accurate, but because writing this kind of tutorials is quite difficult, I can only hope I haven’t missed anything and you, too, will be able to follow the book and make your own track.
All right, let’s start from the very beginning.
Set the Tempo
Open Reaper (or any other DAW you will be using).
Let’s start with setting up the tempo and the metrum (time signature).
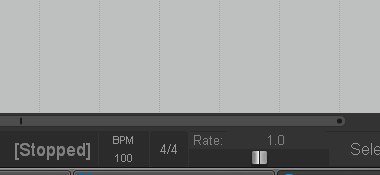
Figure 4.1
In Reaper, you can find these settings at the bottom of the DAW. I decided to use basic 4/4 time signature, which will fit well our basic track.
Tempo is set to 100 BPM. Most of the times, I have the idea for the track in my mind, I try to sign it aloud (when no one is listening, of course), and this gives me the idea of the rhythm and tempo of my musical idea.
Then, I hover “BMP” and just click it in accordance with my “mental rhythm” as I sign the musical idea. I try to identify main strong beats, and whenever it comes up, I click the BMP button. This way, Reaper calculates the basic tempo. It can be changed later if needed, and it can even be changed multiple times as the track progress. But this is not something we need for this particular track.
I’ve chosen 4/4 time signature, because it fits my musical idea and the basic rhythm I have in mind. The same goes for tempo. Tempo, along with time signature, defines our rhythm and speed of the entire track.
Now we have the tempo and metrum defined. This will be the base of our track.
Core Chord Progression
To simplify things, we will settle on a very simple form of this musical track: AAA… in which we will have the basic chord progression repeating over and over again, slowly building up to “grand finale”. There are many forms in music, like ABA, ABAB etc., and they often have their own names: rondo, sonata etc. Basically, each letter represents a specific piece, or a section of the entire track. In case of our form, we will have a small piece (section) of music repeating and expanding.
Everything in our track will be based on five simple chords.
Basically, there are two ways to start composing. You can start with the melody, or start with chords. Neither approach is better, but for many beginners, starting with chords is easier. This is the way we’ll start, with chords.
If you want, you can start composing with the melody, and then harmonize it, adding chords, but for many people this approach is more difficult, especially if they’re just beginning their adventure with music and don’t know much about chords.
By now you should know that chords are sets of notes that sound well when played at the same time.
A couple of chords next to each other is called chord progression, and this chord progression is the core of each composition. Chord progressions can be long and complex, or very simple. For our track we will use a simple progression of five chords that will fit inside four bars. The entire track will be based on these chords and these four main bars.
We will base our chord progression on the key we (well, actually I) decided to use, key of A, in the natural minor scale. This way our track won’t be too “happy”, but it won’t be too sad at the same time (it’s an oversimplified explanation of chords and moods, but it doesn’t matter right now).
Now, create a new track in your DAW, load Kontakt, and then load a piano instrument for this track. I use various terms, like track or “midi box” for this white area you see below, which in the example below is four bars long.
Figure 4.2
Every DAW is different, so if you’re using something other than Reaper, you will have to figure out how to create tracks by yourself (use the power of Google, or the DAW’s manual).
Anyway, let’s say a new track in DAW is ready. I have made it four bars long. This will fit nicely to our 4/4 time signature. In Reaper, you see the scale right above our white box. You can see that it’s four bars long.
Load the Instrumet
Load your favorite grand piano instrument. I’m using Concert Grand from Kontakt Factory library. Now, it’s very important to do one thing: turn off the reverb! A lot of instruments loaded into contact have some kind of reverb turned on after load. You want to turn it off. In case of Concert Grand, it’s that On/Off button right under “Amount” in “Master FX” section, as you can see on figure 4.3 in the bottom right corner.

Figure 4.3
We turn the reverb off for two reasons:
- When you have 20 or 40 instruments loaded, it will nearly kill your CPU. Turning reverb off is a great idea to save resources.
- Different instruments have different reverbs. But we want our track to be unified as much as possible. Therefore, at the very end of this book, we will add only one, single reverb effect for the entire track. Not only it saves CPU power, it also sounds better.
So from now on, please turn off every reverb from every instrument.
Piano not only sounds great in many tracks, but it’s also a simple, clear way to compose your music. You can compose an entire track using nothing but piano instrument, see all the melodies, chords and every single element on a single track. Then, after everything is ready, you can copy elements of this piano composition and orchestrate them, voice them by using different instruments.
***
Now, let’s make a simple chord progression based on four bars. These four bars and five chords will be the core of the entire piece. Quite often, complex pieces of music are build upon chord progressions no longer than four to six chords.
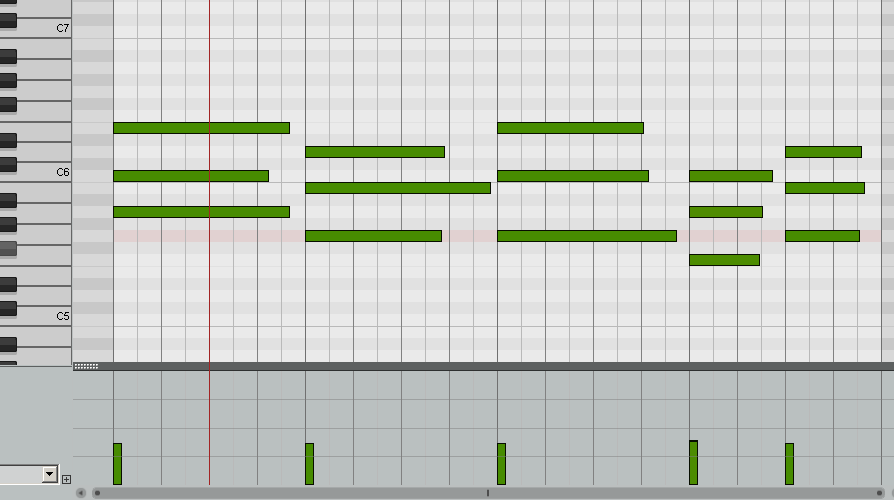
Figure 4.4 – Main chord progression spanning octaves C5 and C6.
Remember, if you get stuck, inside the package for this book you will find an entire MIDI file for this track we’re making.
What do we have here? As you can see, we have five chords in four bars, 1-4. The first one is A Minor, it will be our tonic chord. We’ll start with it and finish with it. The next chords are: G Major, C Major in inversion, F Major and G Major again. You can look at the image and identify the notes as an exercise, or just:
- A Minor: A, C, E
- G Major: G, B, D
- C Major in inversion: G, C, E
- F Major: F, A, C
I made the root notes thicker on the list above. Root notes are the main notes of the chord, that give the chord its name. They are often used to create bass lines of the track. It’s a good idea to take a piece of paper and a pen, and write down the chord progression, mark which of the chord’s note is the root, which note is the third, and which is the fifth, so you have these notes right in front of you as you work on your track.
Now we have A Minor for entire bar, G Major for entire bar, C Major in inversion for entire bar (inverted chord is a chord, in which a different note than root is in the bass), and then F Major for half a bar, and G Major again for half a bar. That makes four bars in total.
Can you see these green columns at the bottom of the image (figure 4.4)? This is how we control velocity. In many libraries velocity controls how “strong” a note is played. High velocity means power, low velocity means gentleness. Set your velocities to be a bit gentler, like on the picture above.
In Reaper, we change velocities by clicking on them, and dragging them up or down. In the bottom left corner of the midi editor, you see a menu, in which you can select “Velocity” from a large list. This way you select various CC controls, offered by all DAWs. You can also select the notes on the midi grid, and change velocities of multiple notes at the same time.
Take a listen to the chord progression you’ve just composed – it’s quite exciting to notice how such simple thing changes into an entire track later on when we orchestrate it.
Let’s take a look at the notes of our chords.
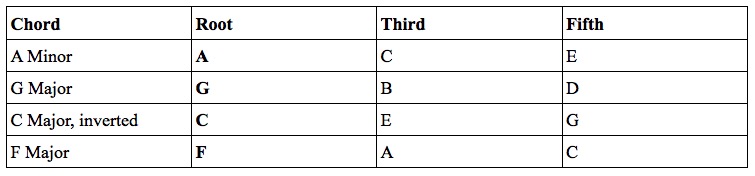
Table 4.1
***
We have a chord progression now, made of five simple chords. From now on we will be basically copying these chords throughout the entire track (because we’re doing AAA form, which does not introduce any different chord progression anywhere in the track).
Let’s add some additional notes, but nothing to fancy. Let’s add D, C and G in three places. Because it sounds nice, simple. Again, these are the notes from our A Minor scale.
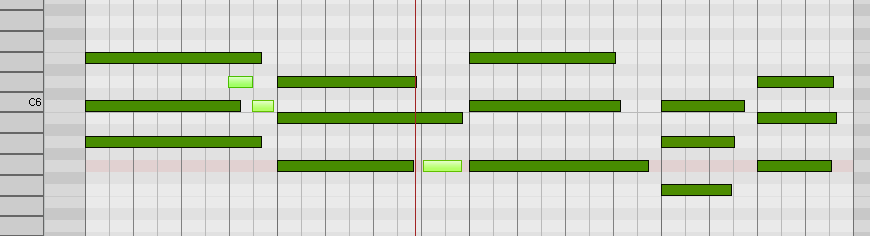
Figure 4.5
Soon you will realize that we compose the entire track using these chords and notes from A Minor scale, nothing else. Some chords will be doubled for other instruments (like from brass section). Sometimes we will double only certain notes from these chords. And we will build our melodies upon these chords and notes from A Minor scale.
Composing in this manner is simpler, so it’s a good practice for beginners. If you don’t have much experience, then try to stick to the diatonic notes of the scale you have chosen.
Don't forget to become a fan on Facebook and subscribe to new posts via RSS or via email.