In the previous part of How to Mix Orchestral Music for Beginners, we’ve created our template for mixing, we’ve loaded the audio tracks and we’ve panned our virtual orchestra. Today we will work on our volume levels, and then I will teach you about the basics of an EQ.
Volume Levels
It’s time to change the volume of individual tracks – some tracks are too loud, some are too quiet. Your goal is to achieve balance – and since you will be using different instruments than I did, you will have to figure out the volume levels yourself for your own unique project.
Here’s a tip – create a balance between the tracks that you like hearing (like this: I like to hear French Horns, so I will make sure to make them hearable). This is the way to go for beginners. But in real orchestral settings, this beautiful creation that is orchestra has been balanced throughout centuries, and realistic balancing of different instruments and sections is a very difficult topic that we will not cover here except the absolute basics.
Basically, the strings are your base, the foundation, and you compare the loudness of other instruments to your strings. Woodwinds should be quieter than strings, they should “blend” with the sound of strings. Brass should be a bit louder than the strings, and the percussion should be louder than the brass. Of course, this does not include the modwheel and dynamics control elements.
Figure 5.12 shows a mixer panel – in Reaper, you can open it by selecting View->MIxer from the main menu. It contains all the same control elements that you can access on the left panel for each individual track.
Figure 5.12
On both the track control panel and in the mixer, you have a control element for volume. In case of most mixers, it’s a slider (called a fader), that goes up and down, like on figure 5.13:
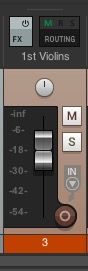
Figure 5.13
Figure 5.13 shows a single control panel for a single track – the volume fader is the one in the middle, between “M” and “S” buttons, and digits such as-6, -18 and so on. The digits show the loudness of the track as measured in dB – loudness is measured from negative numbers up to 0 dB that marks the “loudness limit” you should not pass. If your volume goes to positive numbers, for example +2 dB, +5 dB, you’ll get clipping and unpleasant distortions that can even damage your speakers.
On the very left of the mixer you see the master channel – the final destination, to which all the other tracks send their audio signal. Take a look at figure 5.14.
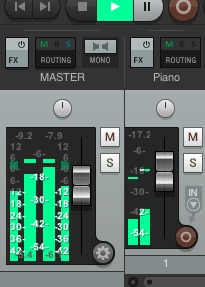
Figure 5.14
The master track shows the volume level for both left and right channel (the far left and far right green columns), and the volume level for the entire track (middle columns). When you start clipping, in most DAWs the colors change to yellow as a warning, and red as clipping. Avoid clipping! Basically, try to mix your track in such a way that the master track do not exceed -6 dB. This space between -6 dB and 0 dB is called a headroom and it’s very useful for master engineers, and generally it is a good practice to leave some headroom in your mix.
To change the volume level of a track, just move the volume slider (or volume knob) up or down, making the track louder or quieter. Your goal is to create a nice, balanced track. For now, just stick to the rule: make it sound nice to you.
Personally, I had to make the first violins and snare drums quieter in my original composition, but I made the horns and the choir louder. Everything depends on the level of realism you’re going for, your experience with listening to epic music, your personal tastes, your composition and the instruments you use. In the video tutorial series, I will probably make different changes because I didn’t follow the original tutorials perfectly.
Equalization
Now we have to do some equalization. Equalization, done through an equalizer, is just a modification of the sound frequencies we want to hear. You can create music without equalizing, but this kind of post-processing work can change the quality of sound. Basically, EQ in mixing is meant to make your music clean and balanced. Before we work on our track, I want to teach you the basics of working with an EQ.
EQ for Absolute Beginners
Equalization is an important element of music production, so it’s worthwhile to learn at least the basics. Equalization basically means that you manipulate the frequencies of the sound in your music. Some frequencies can be cut off completely, others can be boosted or weakened etc.
- Tip of the century: cuts should be narrow, boosts should be wide.
In this chapter we will learn about ReaEQ, the basic equalizer in Reaper. It’s a very simple equalizer that contains the basic elements, present in all other equalizers. Learn ReaEQ, and you will learn other EQ plugins as well. By the way, despite its simple look, ReaEQ is quite useful and powerful :). You can add it to your track by going to FX widow and finding ReaEQ in the plugin’s list.
The Basics of EQ
You probably are familiar with the term “Equalizer”, or “EQ”. Most home audio gear has one. We use it to change the lows, mids and highs of our music, usually using three knobs :). EQ in DAW is similar, although there are many types of EQ, and some plugins have a lot more controls. When making music, we use EQ to make surgical changes to our sound, boosting or cutting specific frequencies of the entire sound spectrum.
Basically, every instrument makes a sound in the entire spectrum, every instrument has lows, mids and highs. We use EQ to manipulate this spectrum of sound, either on single instruments, or on the entire track.
Figure 5.15 shows a basic equalizer in Reaper DAW.

Figure 5.15
This is what a basic EQ looks like. At the top, you will see the waveform of the sound being played. When the sound is being played, you will see an active waveform there. And below it, you have controls for various parameters.
The black grid area has two scales. The X axis shows the gain level in dB, while the Y axis shows the frequency range from 50 Hz to 20k kHz.
Tabs 1, 2, 3 and 4 represents bands, which, basically, are the frequencies you want to manipulate. You can add and remove bands if you need to modify more frequencies than four.
Next, you see the “Type:” menu, which in this case says “Band”. This is the type of EQ we want to do. We have various options, like high shelves or bands. Let’s take a closer look.
- Low Shelf – cut everything below a certain frequency.
- High Shelf – cut everything above a certain frequency.
- Band – cut things in given range by X db.
- Low Pass – pass everything below given frequency.
- High Pass – pass everything above given frequency.
- All Pass – well, pass everything ;).
- Notch – cut everything in given range between given frequencies.
Now, the best thing to do right now is to load some piece of music and just play around with your EQ. Try to use different types of bands in various places of the entire spectrum and see how it works.
We have three more options:
- Frequency
- Gain
- Bandwidth
Frequency is the range between 50 Hz and 20 kHz that we want to manipulate. Gain can be positive or negative, we can strengthen the given frequency by X dB, or weaken it by X dB. Bandwidth is the range of the frequency we want to manipulate (whether we make a wide or narrow change). It is sometimes called “Q” factor.
For example, we may want to strengthen the sound at 400 Hz by 4 dB, and we want to affect a “given” range of frequencies (meaning, their “wideness”), so we set up the bandwidth to 1. I’ve selected “band” for type. Usually we want to affect either “wide” range of frequencies or “narrow” range of frequencies.
In ReaEQ, we can either type digits into parameters input fields, or click and hold the band circle and move it around with our mouse.
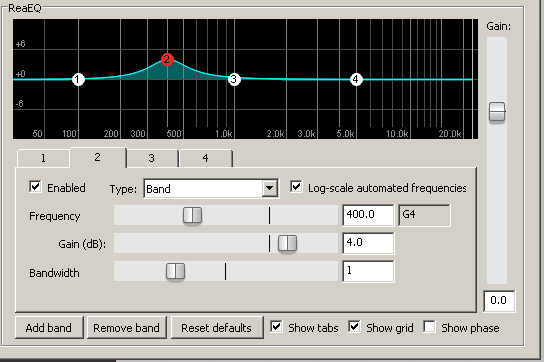
Figure 5.16
On figure 5.16 all the sound at 400 Hz at the bandwidth of 1 will be affected by 4 dB of gain (we’ve boosted this frequency range). Try this with your music and notice how it affects the sound.
Around 400 Hz we usually have mid frequencies. They have a tendency to build up, thus creating muddy mix. Usually, we want to make some cuts here, not gains. But as always, it’s important to know what you want to achieve, so it’s not a general rule.
Tips for Working with EQ
EQ is a complex subject. Different genres require different EQ, and different plugins offer different options. But here are some general tips for beginners:
- Always use your ears – do not EQ any sound just by reading tutorials. Tutorials are meant to teach you what EQ can do and what kind of EQ is required for certain instruments. But the final EQ-ing of your music must be done with this knowledge and your ears.
- If you can’t identify the frequency you want to get rid of or strengthen, just use one of the bands, click on it, and while listening to your music, move it all around and listen to how it changes the sound. Just play around.
- Always watch out for low end (below 100 Hz) and the mids. The more instrument you have there, the more muddy the sound will become.
- Not everything needs an EQ – have a goal when EQ-ing things, don’t use equalization because it has to be there. Sometimes, no EQ is better.
- Cut, don’t boost. It’s better to cut frequencies that to boost them.
- EQ is meant to correct things, not replace things. First try to see if you can fix the problems with the recording or sampling, and if that fails, use EQ.
- Use frequency analyzers, like Voxengo SPAN – http://www.voxengo.com/product/span/ – it’s very useful.
- 2 or 3 dB is enough to start with. Simplicity and gentleness are often the key.
Now you know some basics. Let’s EQ our music. Using EQ in mixing is not an easy task, so I will simply explain how to clean your mix by doing some basic cuts, especially in the low frequencies (the low end).
Normally, you should do this as first step of EQing your mix – clean the instruments. Later on you can listen to tracks in pairs, and then tracks as entire groups, and adjust EQ on various tracks to achieve a balanced sound – but this is an art in itself, so we will not be discussing it in this basic guidebook.
In the next part, we will actually start using an EQ to clean our tracks.
Don't forget to become a fan on Facebook and subscribe to new posts via RSS or via email.