
In this part, we continue the horizontal adaptivity of our music in a more practical way. First we will create interactive zones (triggers) in Unity, and then we will actually write some code today!
Interactive Zones in Unity
Let’s go back to our Unity project from the previous chapter. Select the BackgroundMusic element and turn it off, thus turning off the music added in the previous chapter. Do this by switching of the checkbox next to the object’s name, like on figure 4.25.
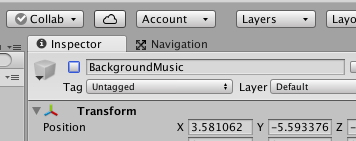
Figure 4.25
Because earlier we have already imported standard assets for characters and camera, and we’ve created a player on our scene, you should be able to play the game now and move around.

Figure 4.26
First, let’s create an empty object on our scene and call it AdaptiveZones. Then reset its position, by choosing the gear icon in the upper right corner of the Transform component and clicking Reset in the menu that appears. We will use this new object to group each of the adaptive zones that will trigger different loops of our music. We will create two zones – the player will be able to move between them, and this movement will result in changing the part of the music being played.
Create a new child object for AdaptiveZones. In the Hierarchy panel, select Create | 3D Object | Cube. Let’s call this object Zone_1. Reset its position as well. Place it somewhere in the scene and scale the cube to (10,5,10). You can also rise the cube, Y 1.5 for example. Of course, everything depends on your own scene – if you’re using your own project for this book, you need to scale the cube to match everything else in your scene.
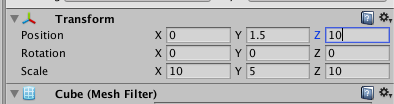
Figure 4.27
In the Materials folder for this project (imported earlier), you will find two simple materials:
- volume_green
- volume_red
Assign one of them, for example the green one, to the cube you’ve created, for example by dragging the material from the Project panel right onto the cube in the scene view.
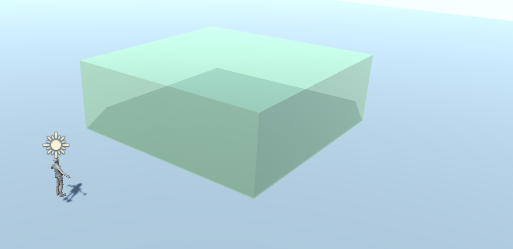
Figure 4.28
Finally, select this cube object, and in its Box Collider component, select Is Trigger checkbox. This way our cube became a trigger and the player can move through it. We did all these steps to simply see the adaptive zone on our screen – in the final game, the trigger will still be there, but it should be invisible to the player.
Now copy this trigger cube, by duplicating it in the Hierarchy panel, and move it left or right, next to the previous cube. Call the new cube Zone_2, and assign the second material to it, so we can actually tell these two zones apart.
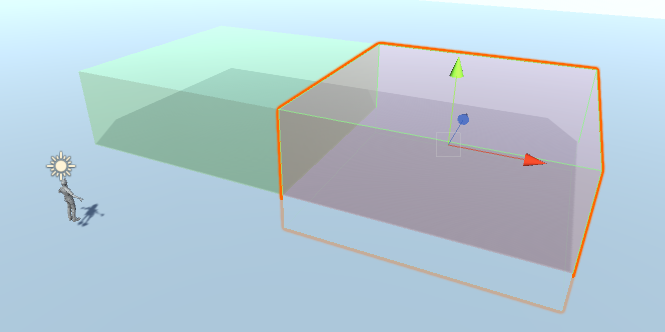
Figure 4.29
This way we have prepared three different zones – two trigger areas and the third default area, that is the entire space around these two triggers.
Scripting Interactive Music
In the Project folder you’ll find a Scripts folder, and inside it there is a C# script called Singleton. This is a popular version of this singleton code that allows you to create single instances of classes in Unity. This is a general and simple solution for this book, but you may have other solutions for this (if you don’t know what I’m talking about, just don’t worry, it will work).
The singleton code from this book can also be checked on the official Wiki of Unity: http://wiki.unity3d.com/index.php?title=Singleton. You can also use some kind of manager classes. If you’re working on your own scene, and you’re not using my project, just copy the code from Wiki, paste it to a Singleton.cs script in your project and you’re done.
I’m using a default, wiki-based singleton script, and you will notice this in my script, when I create a class (Singleton<MusicController>)
Now, create a new C# script and call it MusicController. Inside, type the following code:
using System.Collections;

using System.Collections.Generic;

using UnityEngine;

using FMODUnity;
public class MusicController : Singleton<MusicController> {
private StudioEventEmitter musicEmitter; // this variable stores the event

public string parameterName; // this variable stores the name of the parameter to change
void Start()

{

musicEmitter = GetComponent<FMODUnity.StudioEventEmitter>(); // we assign a component to this variable

}
public void ChangeLevel(int level) // the level value is passed to this script from another script

{

if(musicEmitter != null)

{

musicEmitter.SetParameter(parameterName, level); // set the FMOD parameter

}

}
}
The MusicController script will be controlling music in our scene. First, we create two variables.
- musicEmitter – this is a variable of the StudioEventEmitter type that stores information about the component attached to the MusicController object.
- parameterName – this variable stores the name of the parameter inside FMOD that we want to change using script.
Now, in the Start() method, let’s initiate the musicEmitter variable. We assign a Studio Event Emitter component to this variable. We will add this component soon to an object on our scene.
Next, we write our own method, ChangeLevel(), which uses a single argument, level. This method checks whether musicEmitter variable is assigned. If the variable isn’t empty, it means music is playing (well, basically). Next, we call a method SetParameter, which is a built-in method in FMOD package, which takes two variables as arguments: parameterName that defines which parameter in FMOD’s project we want to change, and level, which is a new value we pass to this parameter.
This value will be passed from another script, that will be attached to our interactive trigger zone. Anyway, let’s go back to Unit.
Create a new empty object on the scene and call it MusicController. Add two new components to this object: FMOD Studio Event Emitter and a script we just created, MusicController.cs.

Figure 4.30
Assign the HorizontalMusic event to the Studio Emitter component. Set the way it’s played (Play Event dropdown menu) to Object Start. This event has been created at the beginning of this chapter in FMOD. Now, in the MusicController script you will see Parameter Zone variable with an input field. There, type Adaptive_Level which is the name of the parameter we have created earlier in FMOD.
Select Zone_1 object now and create a new script for it. Call this script AdaptiveZone. Open the script in scripts editor and type the following code there:
using System.Collections;

using System.Collections.Generic;

using UnityEngine;
[RequireComponent(typeof(BoxCollider))]

public class AdaptiveZone : MonoBehaviour {
public int level; // this value will be added in the Inspector; it will be passed to the MusicController script
void OnTriggerEnter(Collider collider)

{

MusicController.Instance.ChangeLevel(level);

}
void OnTriggerExit(Collider collider)

{

MusicController.Instance.ChangeLevel(1);

}
}
This script requires BoxCollider component, and we define a new variable level at the beginning of the script. Later on, we will set this variable through our Inspector for this particular zone. In the script we create two methods: OnTriggerEnter(), which we use at entering the trigger zone, and OnTriggerExit(), that we use at exiting the trigger zone.
Both methods call a MusicController script using dot syntax. Specifically, we call a ChangeLevel method within MusicController script, and we pass the level value to this method. In case of exiting the trigger, OnTriggerExit(), we pass the value of 1.
Let’s go back to Unity editor now. Select Zone_1 object and in the Inspector, set value 2 for the Level variable. Assign same script, AdaptiveZone, to Zone_2 object and set its Level value to 3. This way we have created two zones of interactive music, with two levels: 2 and 3.
Start the game now and wait for the first loop to play. Once the first loop is being played, walk into the first zone (doesn’t matter which one, just choose one of them), and you should hear as the music changes to another loop. Exit the trigger zone and our music should return to the first loop. Enter the second trigger zone, and music will change to yet another loop. But, if you decide to move from first trigger zone to the second, and both trigger zones are placed face to face (umm, wall to wall?), our script may become lost and admit defeat.
We can fix this with some additional code, or conditional instructions or additional variables, but we can also fix this problem by separating the two trigger zones from one another. In other words, move them a bit away from each other, creating an empty space between them. If you do this now, you may hear too many loop changes, but soon we will add transitions to our music, and basically, with this simple trick we will not notice anything wrong with our music.
Congratulations – you’ve created your first interactive music in Unity, using FMOD! These simple solutions can be used in many ways – they can change music if enemies get nearby the player, or when we display some kind of dialog windows in an RPG game, too.
***
Useful Tip
I use triggers in a form of whole regions – big boxes that change the music on enter and exit. But you can use them as walls, too, acting as switches that change parameters (thus, music) only on OnTriggerEnter(). Imagine an invisible wall of a trigger, through which the player can walk on a linear map along a given path, so that music can change stage after stage of this path.
***
Right now our transitions between the loops are weird and instant. So we need to create transition regions between the loops. Let’s go back to FMOD and select the HorizontalMusic event.
Transitions Between the Loops
Let’s create new transition regions. It’s best to simply copy the B and C transitions and paste them right at the beginning of the track. They already have their conditions assigned (in the Conditions panel), so this is a simple solution, thanks to which we won’t have to wait for our first loop to play at the beginning of the game. This will speed up the testing process. Don’t copy the a transition, because we want for the intro of the track to be played normally if we don’t enter any trigger zone.

Figure 4.31
Thanks to this simple trick, once we return to Unity, we won’t have to wait for the first loop to play to test our triggers.
Let’s get to work on our transitions now. Transitions in FMOD are the “things” (sounds, music) that are played between two separate regions. These transitions can be of any length, and they can contain different audio files. All of this will be clear soon.
We will us a simple crossfade here, and the first part of the transition will fade out, while the second part of the transition will fade in. This way we will create a rather smooth transition to another part of our music. To create the first transition, double-click the To B transition region under A loop – I mean the green thing with arrows. This will literally expand a transition area, and the timeline will change its color to green, as well, like on figure 4.32.
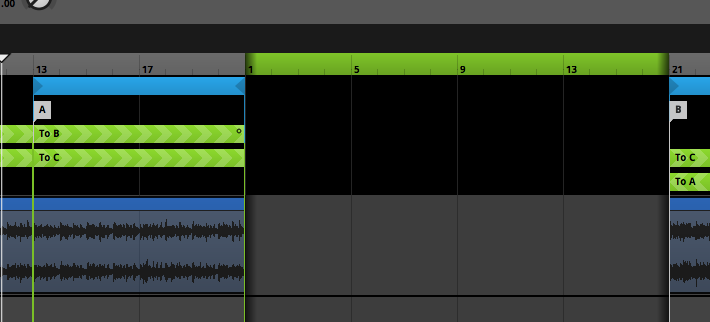
Figure 4.32
This is the transition from loop A to B. Play the track now, inside the A loop and then, while playing, change the Adaptive_Level knob to somewhere between 2.00 and 2.99 to trigger the transition. This time you will see that our music jumps to the empty transition and it is played there for as long as we set the transition to, until it jumps to another loop. This is because by double-clicking the transition region, we already create the transition itself – but by default, the transition is empty, thus there is nothing to play there.
First, let’s change the length of the transition. Place the mouse cursor above the right side of the timeline, right between the green and grey piece of the timeline. The cursor will change its shape and you will be able to change the length of the transition by clicking and dragging it left or right. Change the length of the transition to two bars. Use Alt key and mouse wheel to zoom in if you have to.
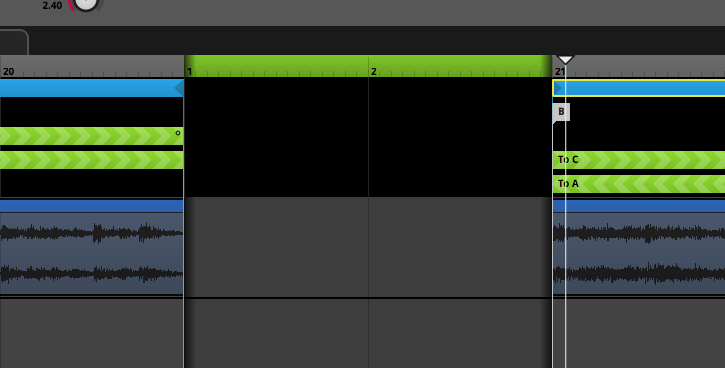
Figure 4.33
This way we have shorten our transition and it should be two bars long now. Now we can add audio files to our transition. Switch to the Assets tab in the left panel, and drag a file fmod-kurs-drums-transition.ogg onto our transition audio track.

Figure 4.34
Now, when you play the music and change the parameter to switch to another loop, instead of nothing you will actually hear the drums file in the transition. Let’s crossfade two tracks together now. Place the cursor over the left border of the Main Track in the transition area, and click and drag the track left, so that it fills both bars of the transition, like on figure 4.35.
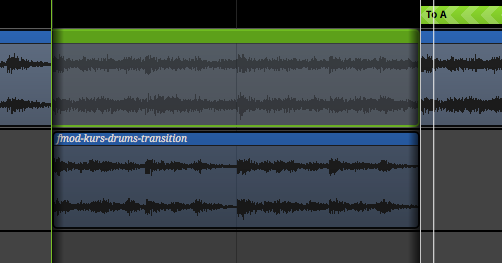
Figure 4.35
This way the track from the loop that ended will continue to play in the transition. Now place the cursor above the upper left corner of the fmod-kurs-drums-transitions module. The cursor should change its shape, and you will be able to click and drag the fade in/fade out curve towards the upper right corner of the module. A white curve will appear on the module. Repeat this process the other way around on the green module of the Main Track. Then, click the “diamond” icon in the middle of both curves and drag them in such way that they actually cross, like on figure 4.36.
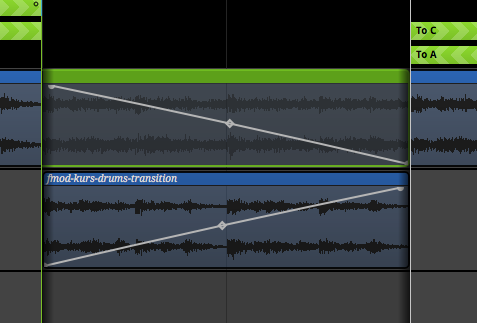
Figure 4.36
If you imagine that both modules are placed on above the other, you’ll see that these curves literally cross each other. This way, the green module will fade out, and at the same time, the blue module will fade in. Since both modules contain the very same drums (that were part of the original composition, but were exported separately for the purpose of such transitions), the entire transition will sound very smooth.
But that’s not all. If you play the track again, you’ll notice that the rhythm of both modules is not synchronized. Let’s go back to the To B green transition region in the A loop. Select this transition region. In the dock, next to the conditions panel, you will see a second panel on the left, called Quantization.
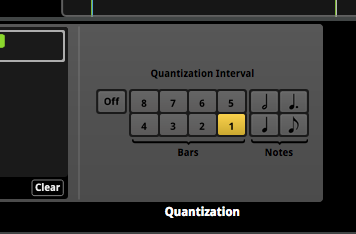
Figure 4.37
In it, click the 1 digit. This way you set the transition to occur each bar – and not instantly. Without this, once Unity sets a new parameter value, the transition is instant. But by setting these intervals, something else happens: once a new parameter value is set, FMOD waits for the beginning of the nearest full bar before initiating the transition. This way, you can make sure the transition fits the rhythm.
After setting the intervals, you will notice that the entire A loop has been divided by vertical lines, like on figure 4.38. These lines mark the intervals of our transitions. You can also initiate transitions every 2, 3 or 4 bars (or more), or every full note, half note, quarter note and so on.
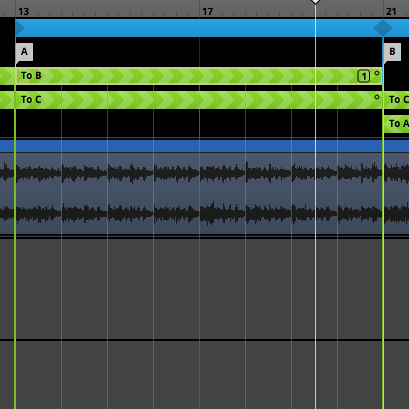
Figure 4.38
Play the track now and you will notice that at the moment of changing the parameter value, the first loop continues until a new bar is started, and at this point the transition is triggered. Because our transition drums are in sync with the rest of the track, and because we also use the crossfade technique, the entire transition is smooth.
Right-click the fmod-kurs-drums-transitions module and select Copy from its menu. Create other transitions for each and every transition region, by shortening them to two bars, pasting the drums module and creating crossfades. This time, the drums module already has its curve, since we copied the entire module with its settings. But you have to drag the main track into the transition manually and set its curve yourself.
By the way – when you create a transition to an earlier loop, nothing changes – the origin loop is still on the left, and target loop is still on the right. It’s a bit counterintuitive since in reality the target loop is earlier on our timeline, but when you think about it, it’s quite logical. Don’t be surprised when you notice this.
Set the quantization to 1 bar for all transition regions.
This is rather tedious task, but thanks to our work, the transitions will sound better in our game.
Build and save the project now. Go back to Unity and play the game. Move between the trigger zones and you will notice the transitions are quite smooth now. And we have fixed the problems of trigger zones touching each other – after separating them a bit, the player will hear only smooth transitions to proper loops, because now, with the transition regions, there is no time for the player to hear any problems with our code solution – literally!
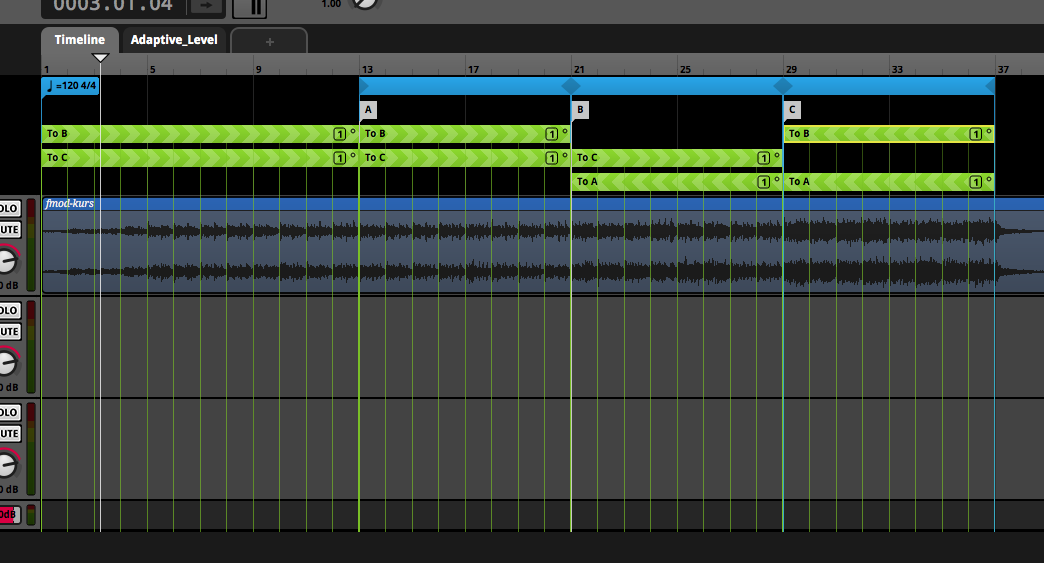
Figure 4.39
This is one of the cons of the horizontal technique. It requires a bit of planning for the transitions, once parts of the music are looped. Using the crossfade (x-fade) techniques is a simple solution in many of such situations. Often, for the purpose of transitions, stingers are used – short sound files that are meant to literally hide everything under them due to their loudness.
Now you know how to create interactive horizontal music in FMOD. You can create horizontal music using a single piece of music, or by placing various audio modules on multiple tracks. Each event can have multiple parameters. Loops can also be used to play repeatable sounds, such as footsteps or gun fire.
Before we talk about vertical music, let’s learn how to use randomness in our music and what are snapshots used for.
Don't forget to become a fan on Facebook and subscribe to new posts via RSS or via email.
More from my site
 Interactive Game Music for Beginners with FMOD – Part 7
- Interactive Game Music for Beginners with FMOD – Part 6
- Interactive Game Music for Beginners with FMOD – Part 3
- Interactive Game Music for Beginners with FMOD – Part 2
- Interactive Game Music for Beginners with FMOD – Part 1
- Interactive Game Music for Beginners with FMOD – Part 4


