
In this final part of the course, we will learn how to use vertical adaptivity. Then, to finish the basics of FMOD and Unity, we will discuss how to create smooth audio and snapshot transitions.
6. Vertical Adaptivity
Let’s talk about vertical adaptivity. First, we will create a new event, and then we will make small changes to our FMOD project, so that it can use all the same objects and scripts, but use a new vertical event. Let’s go to FMOD.
Create New Event
Create a new 2D event and call it VerticalMusic. Assign it to a Master Bank. Drag all the files from Vertical_Layering folder to an Audio Bin. Seven files in total. They represent different layers of our music. Select the event now and open the Assets tab. Create seven audio tracks in the event, calling them according to the imported files, and place all of these seven files on these tracks. Next, create a new loop region that spans the entire length of the track. All these things should be familiar to you. When done, you should see something like on figure 6.1.

Figure 6.1
Play the music now, which will loop and play around with the Mute button (M) on some of the tracks to hear different combinations of layers.
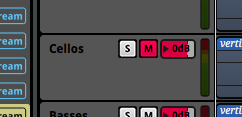
Figure 6.2 – “Mute” button pressed – the track is muted.
Now our adaptivity level is greater in scale. While in chapter 4. we’ve used a 1-3 scale, now our intensity parameter will allow us to set the intensity in 1-100 range. We want to gently change the volume ratio of specific tracks in accordance with the intensity parameter. To do so, we can use a coroutine script in Unity, that uses for loop, thanks to which we will change the parameter’s value step by step.
Create the Control Parameter
Let’s create a new parameter. This time we will use a different way to make one. First, select the first module, the one at the top – most probably it’s the 1st Violins track. Make sure you’ve selected a module, not a track. Click the white arrow in the upper left corner of the dock, and then click Add Condition in the Conditions panel.

Figure 6.3
Because we haven’t created any parameters yet, our menu will have only one option. Click Add Parameter Condition and then New Parameter.
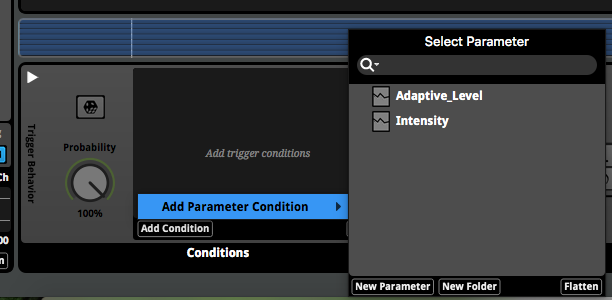
Figure 6.4
Type a name for this new parameter, for example VerticalIntensity, and set its range between 1 and 100. I’m pretty sure those of you who know coding will be terrified now, seeing letters l and I next to each other, but this is a simple guide, so we won’t bother ;).
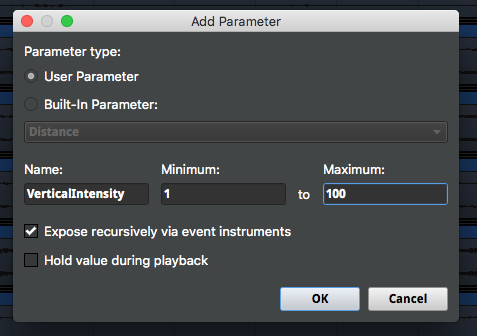
Figure 6.5
After creating this parameter, you will notice that a knob appears at the top of the editor, but no additional tab for this new parameter is made visible next to our Timeline tab.
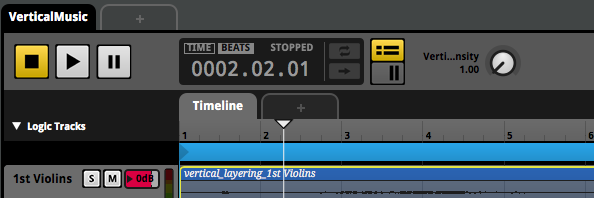
Figure 6.6
Now we can work through the less pleasant part of this chapter – logic.
Logic and Automation Curves
Which layers of the track should be played at which point? Which should blend together? In our Unity scene, we will use two areas – the general space, and one of the trigger zones. Our parameter, VerticalIntensity, can be divided into two parts: range 1-50 and range 51-100.
We may want to play the following layers at given intensity:
- 1-50: drums and short strings
- 51-100: all layers except the drums
Thus, we must assign the VerticalIntensity parameter to specific layers.
Choose the first module – probably it’s the 1st Violins. Choose this module, and at the dock, right-click on the volume knob and from the menu, choose Add Automation.

Figure 6.7
Now in the dock, at the right side, click the Add Curve in the Audiomation panel. From the new menu, choose VerticalIntensity parameter – this is the parameter we want to use for automation curve that will control the volume of the track.
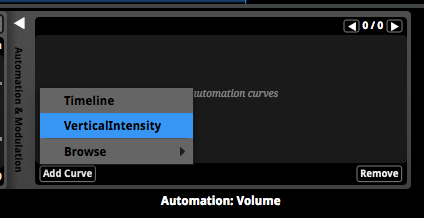
Figure 6.8
Pod ścieżką pojawi się krzywa automatyki.
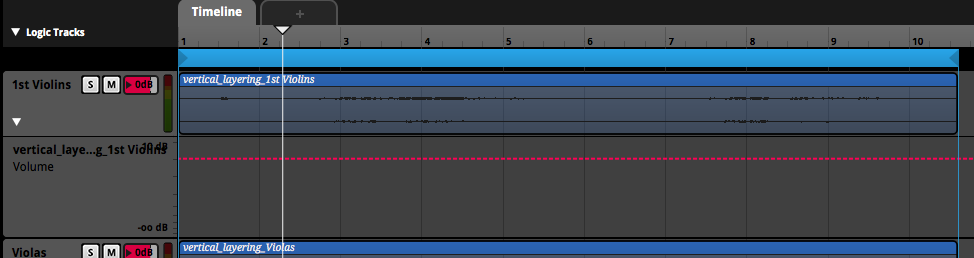
Figure 6.9
Now, click on the VerticalIntensity curve (in the dock, in the automation panel) in two places. This way, you will create two points. Click them and drag them to given positions. The left point should be placed at the very bottom, near 50 (of the horizontal scale), and the second point should not change its height, but should be placed around 60. If you click the point with the right mouse button and choose Edit from the menu, you will be able to type the values manually.
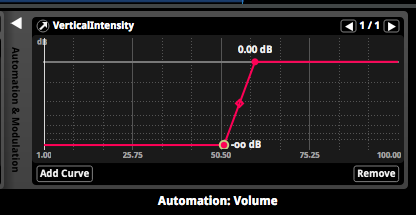
Figure 6.10
How to understand all of this? Take a look at figure 6.10. The bottom, horizontal scale shows a range between 1 and 100. These are the values we’ve created when creating the VerticalIntensity parameter. Now, try to turn the knob of this parameter, visible at the top of the editor, and notice how the control cursors on the track and in the automation panel change as you do so, changing the volume at the same time.
***
Useful Tip
Notice on figure 6.10, that between the two points you can see a third point, shaped like a diamond. Clicking it and dragging allows you to change the shape of the curve itself. This works the same way a curve worked in transitions explained in an earlier chapter.
***
Until the value 50 of the VerticalIntensity knob, the track is muted entirely. Then, between 50 and 60, the volume goes up slowly, until, above 60, the track is at its full volume. With similar curves you can control blending of all the other tracks.
Now you need to do some tedious work. Here are the guidelines for all other automation values. Remember, that 0 dB means no change in volume (track is at normal volume).
- Violas:
- Point: 50 / silence
- Point: 60 / 0 dB
- Cellos:
- Point: 50 / silence
- Point: 60 / 0 dB
- Basses:
- Point: 50 / silence
- Point: 60 / 0 dB
- Strings:
- No change, constant playback.
- Taikos:
- Point: 50 / 0 dB
- Point: 60 / 0 silence
- Conga:
- Point: 50 / 0 dB
- Point: 60 / 0 silence
Here are the curves for Taikos and Conga:
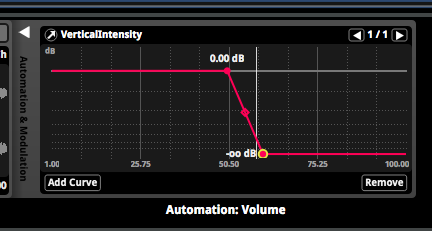
Figure 6.11
You’re done. The parameter’s curves control the volume of all the track layers. Now we can go back to Unity and make changes to our scripts so that they can control nice transitions between different values of intensity.
Build and save the project. Go back to Unity.
Scripting
In the Hierarchy panel, choose the music controller object – MusicController. Find in its Inspector the FMOD Studio Event Emitter component and switch the HorizontalMusic event to VerticalMusic.
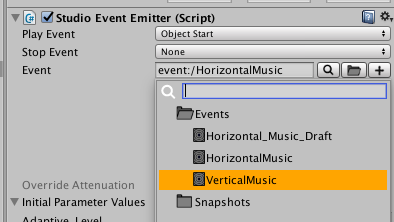
Figure 6.12
Now, when you test the game, you will hear different music in the background. We need to make some changes to our scripts to make everything work. In MusicController object, in its Inspector, change the parameterName variable from Adaptive_Level to VerticalIntensity, because first we need to set the parameter we wish to interact with.
In the Hierarchy panel, find the first trigger, Zone_1 and select it. Change it’s Level value to 60.

Figure 6.13
Now when the player enters the trigger zone, the coroutine will change the parameter to this value, thus changing the music. Level 60 is the moment of full transition to a new piece of music (different set of layers).
Open the MusicController.cs script. At the beginning, declare a new private variable:
private int currentLevel = 1;
We will need it for some simple math. Next, find the following piece of code in the ChangeLevel() method:
musicEmitter.SetParameter(parameterName, level);
Change it to:
StartCoroutine ("VerticalMusicChange", level);
This will call our coroutine. Now, in MusicController.cs script, create this new coroutine:
private IEnumerator VerticalMusicChange(int level)

{
if (level > currentLevel) {

for (int i = level - 10; i < level; i++) {

musicEmitter.SetParameter(parameterName, i); // setting the parameter in w FMOD

yield return new WaitForSeconds (0.5f);

}
currentLevel = level;

} else if (level < currentLevel) {
for (int i = level + 10; i > level; i--) {
musicEmitter.SetParameter(parameterName, i);
yield return new WaitForSeconds (0.5f);
}
currentLevel = level;
}
}
Our VerticalMusicChange coroutine takes a single argument, level – this is the variable that stores the value of our intensity parameter, which we define in the Inspector for a given trigger zone.
Then, this variable checks whether level is greater than currentLevel, declared earlier. If true, a for loop is triggered. This loop takes level -10 as iterator, and then iterates through this value until i is equal to level. During each loop, a new value is passed to the FMOD parameter using musicEmitter.SetParameter(parameterName, i) method.
After finishing the loop, we assign new level value to our currentLevel variable to store it.
If level value is less than currentLevel, the second loop do the opposite. It adds 10 to level value, and with decrease this value until i isn’t equal to level. Each time, new value is passed to FMOD parameter.
This isn’t an elegant script for sure, but it works and for now, so it’s enough.
Open the AdaptiveZone script now. Inside, find a OnTriggerExit() method and make a small change there. When calling ChangeLevel() method, change the argument:
MusicController.Instance.ChangeLevel(level-10);
This way, we pass a level value to this method, but we decrease it by 10 points, so that this value can be smaller than currentLevel, which will call the second loop.
Now, test the game and you should hear that music changes while entering and leaving the trigger zone.
You’re done. Now you know how to use coroutines to control parameters in FMOD. Of course, FMOD wouldn’t be so popular if the above would be everything it has to offer. There is a simpler way! Now that you know the not-so-elegant solution, we can learn how to make transitions a way better and simpler.
Smooth Transitions in FMOD
Let’s go back to FMOD now. Next to the Timeline tab, click the plus + button, and from its menu choose VerticalIntensity parameter. This will display previously unavailable panel for this parameter. Click the new tab that appears next to Timeline.
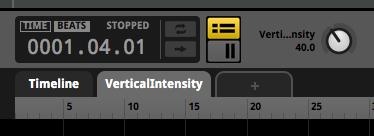
Figure 6.14
At the bottom of the editor, in the dock, you should see a panel, Seek Speed. This is the speed of the parameter’s change – the speed of its interpolation. This value controls how fast the parameter’s value change between two set values. Basically, if the parameter is set to 10, and you pass a new value to it, let’s say 50, the Seek Speed defines, how fast FMOD will change the old value to new one, going through values in between.

Figure 6.15
Set this value to 5 seconds, like on figure 6.15. Play the music and while displaying the VerticalIntensity tab, turn this parameter’s knob. You will see two new control cursors above the tracks – one moves with the parameter’s knob, and the second one, more transparent, tries to keep up. Also, on the knob itself you will see something like a “progress bar”.
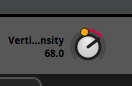
Figure 6.16
Build and save the project. Go back to Unity.
Changing Scripts to Use Seek Speed
Recall the change you’ve made to ChangeLevel() method in MusicController script. The one in which we’ve changed musicEmitter.SetParameter(parameterName, level); toStartCoroutine (“VerticalMusicChange”, level);.
Well, delete this change and put this code again:
musicEmitter.SetParameter(parameterName, level);
Next, in AdaptiveZone script, go to MusicController.Instance.ChangeLevel(level – 10); and once more change it to:
MusicController.Instance.ChangeLevel(1);
By doing so, we’ve undone most of the changes we made earlier to use coroutines. Just don’t change the value of the Level in Inspector for trigger zone object. It should still be 60.
Play the game now and test the trigger zone. Enter the zone, and music will change. But this time, the change will be smooth, much more than when we used coroutines. This is because we’ve set the Seek Speed, which goes through in-between values automatically.
And now you know much more about the basics of vertical adaptive music.
Smooth Snapshots in FMOD
You may wonder now: if we can make smooth transitions between different values of the parameter, can we also make smooth transitions between snapshots? You may have noticed that our snapshot, the one that muffles the music when health is low, is quite… instant.
The answer is: yes. Let’s learn a simple trick to do so. Go back to FMOD.
Switch to the mixer window. Then, choose Routing tab, and assign VerticalMusic to Music group – the same way you did so for HorizontalMusic event.
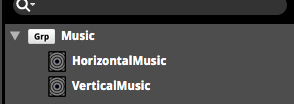
Figure 6.17
This way, our vertical music will be controlled by the snapshot, because the snapshot controls the entire Music group. Go to Snapshots tab, and select LowHealth snapshot.
In lower right corner you should see an Intensity knob. Right-click on it, and from its menu, choose Add Modulation | AHDSR.
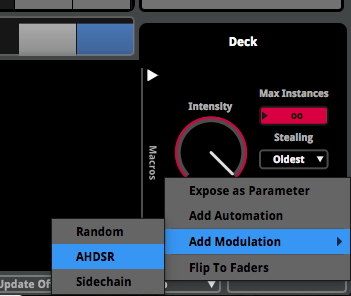
Figure 6.18
That’s it. Really, now when you test the snapshot, it will be triggered slowly and the entire transition to muffled sound will be smooth. If you want to change the speed of this transition, change the Attack and Release values in AHDSR: Intensity panel, for example to 5 seconds.

Figure 6.19
Once more, build and save the project. Now test the game in Unity. When you enter the health trigger zone, and your health drops below 50, the muffling snapshot will be triggered much smoother. When you use the healing ball next, the snapshot will be turned off smoother, as well.
You’ve learned how to make vertical interactive music and control its smooth transitions. You also know how to make smooth transitions between snapshots, too! Of course, the volume curves can be much more complex, and a single music event can contain many adaptive levels to switch between.
By the way, the vertical and horizontal concepts can be used together. A single event can also contains many different parameters. Just be careful not to get lost in the logic!
Summary of the course
FMOD parameters and “audio as modules” allows us to create quite a lot of interactivity in game music. This short guide introduced you to some basic concepts of working with FMOD and Unity. These basics are a good starting point – every music project in a game is based on the same ideas: planning, composition, FMOD logic, parameters and control scripts.
Thanks to this short guide, you now know how to work with audio in FMOD.
Don't forget to become a fan on Facebook and subscribe to new posts via RSS or via email.
More from my site
 Interactive Game Music for Beginners with FMOD – Part 6
- Interactive Game Music for Beginners with FMOD – Part 5
- Interactive Game Music for Beginners with FMOD – Part 3
- Interactive Game Music for Beginners with FMOD – Part 2
- Interactive Game Music for Beginners with FMOD – Part 1
- Interactive Game Music for Beginners with FMOD – Part 4


