In 2018 I made a short article and video about arranging for strings – it was a simple guide for beginners and even if I’m working on a more complex article right now, the basic article is still very useful, so I’m republishing it today.
Basic arranging for strings isn’t too difficult. You take a piano composition, and then you assign each of the notes (from the melody and from the chords) to each of the instruments. Such basic orchestral texture is made of 1st and 2nd violins, violas, cellos and basses. Watch the short video to see this mixture of instruments in action. Remember that the strings are melodic instruments, they really want to play melodies instead of constant, sustained sounds.
In my course, How to Make Epic and Orchestral Music, I say that you should never buy too many libraries – that’s why my own collection of string libraries is limited to Cinematic Strings 2, my main library, and some older strings by 8Dio, such as Adagio series (I love the vintage sound!). The video below uses only Cinematic Strings 2.
If you’re completely new to strings, read a little more about this orchestral section (the string section).
All right, now to the video:
Screens and Description
Let’s take a closer look. First, the piano composition, which for the purpose of this tutorial is very basic.
Piano Composition
The image above shows our piano composition. We see some basic chords and the main melody using the notes from our chords and our scale. The basic way to arrange strings based on a piano composition is to assign each “melody line” to a separate subsection of the strings section.
1st Violins
For example, we can assign the main melody to our 1st violins. The highest notes of our composition are assigned to the instrument which is highest in pitch – such as violins. Our ears are used to hearing the melody as the highest notes – so if you want your main melody to stand out, assign it to the highest register.
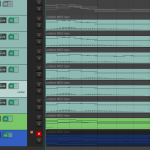
Notice the green wave at the bottom of the image – this is my modulation CC so the strings can rise and fall, creating greater dynamics throughout the piece.
Now we are done with the melody. Let’s work on the chords. Every chord in this composition is made of three notes. We may take a look at these notes are three separate melody lines.
2nd Violins
Above, now we assign the top notes of the chords to our 2nd violins. This would be our first melody line. In this case, I simplify the dynamics and modulation. Notice that I have added additional notes between the main structural tones of the chords – I’ve added note F between G and E (first two chords), and I’ve added note E between F and D notes (third and fourth chord). This makes the melody more interesting.
Violas
Above, the middle notes of our chords are assigned to violas and this would make our second melody line based on the chords – again, I’ve added additional notes between the chords, note D and note C. Again, I simplify the dynamics.
Cellos
Above, finally, the lowest notes of the chords are assigned to the cellos, providing the bass line. The last instrument that still needs to be arranged are the basses.
Basses
Instead of doubling the cellos (which is a common practice when writing for strings), in this case basses create a simple counter melody, using the notes of the chords.
And that’s it – assign the melody to the 1st violins, and then assign other string instruments to “melody lines” based on your chord progression.
If you want to know more basic techniques about writing for strings, check out my string ostinato patterns tutorial.
Don't forget to become a fan on Facebook and subscribe to new posts via RSS or via email.