The time has come to create our grand finale and finish our track! This is the last part of the series, but don’t worry – there’s going to be a free expansion, in which I will teach you how to mix orchestral music.
Watch the videos
There are three videos for this tutorial:
1st
2nd
3rd
Grand Finale
Now we’re going to create the finale of our tracks, which means we’re going to add quite a few new instruments.
Let’s work from the top.
Create a new track, Violins 2nd, if you haven’t already (or double the 2nd violins if you did), and load another violins ensemble instrument. Create a midi box in grids 26-29, and open midi editor.
We’re going to add some melody now. It will start on G, move to A, our main note, and then it’s going to double a bit. By now you should be able to identify all the notes, so go ahead and copy them. Doubling some notes in octaves adds power to these parts of the track.
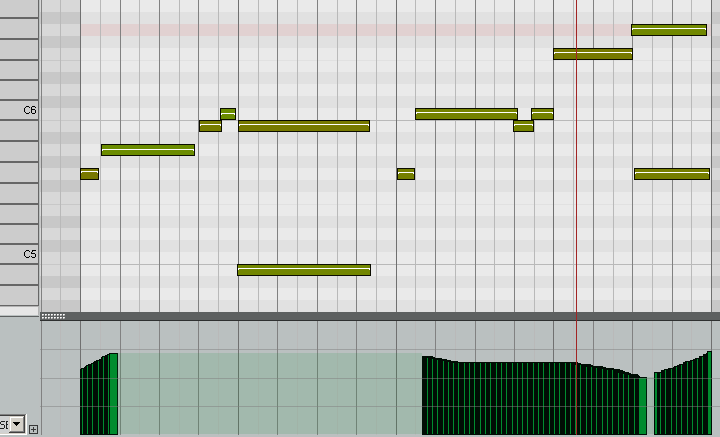
Figure 4.38
Again, we’re working on the notes from our A Minor scale. Notice the expression control and create something similar.
Now move to our Woodwinds section.
Create a new track for Woodwinds group, and load a flute or flutes ensemble. Set articulation to staccato. In grids 22-29, copy the violas part into our new flutes part, then open the midi editor on flutes track, and move everything to a higher octave, so that the C note goes to C6. You can move any note or group of notes by clicking and dragging them.
This way, flutes are doubling the violas part.
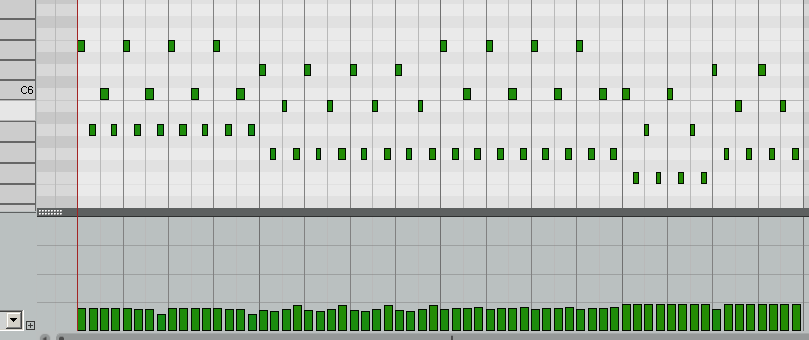
Figure 4.39
This is what it looks like. I’ve changed the velocity to a lower one, so the flutes won’t be too loud.
Main Melody on Horns
French Horns are a powerful group of instruments. While horns are capable of playing wonderful, soaring and gentle melodies, they also have huge power, and can be used in epic music as well.
In our Brass group, create a new track for French Horns, and load a French Horns ensemble. Here I’m using French Horns from CineBrass CORE library.
Now that the library is loaded, let’s make the melody. It will be a two part melody with simple repetitions. This is the first part, for bars 22-25.
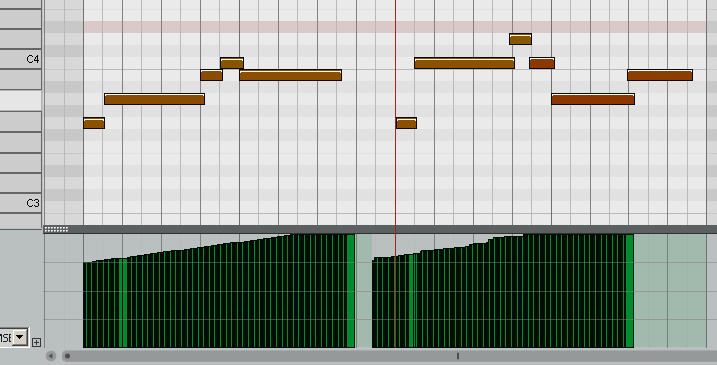
Figure 4.40
This time, I’m editing not the expression, but mod wheel control, because this is the one CineBrass uses to shape realism and expression of the French Horn.
Notice the notes we’re using in this melody: G, A, B, C, D – these are all the notes of the A Minor scale, and we’re not using any notes beyond this scale.
As you should know, melodies and chords are interconnected. Composition can differ, but the general rule is that the note beginning the melody should be present in the chord harmonizing this melody. For example, if our chord contains notes C, E and G, we should start the melody with one of these notes.
Sometimes, we can do things differently, like I did in this track, the melody starts with G, not present in our A Minor chord, but soon enough it jumps to A, so we’re cool.
Figure 4.41 shows the melody for bars 26-29:
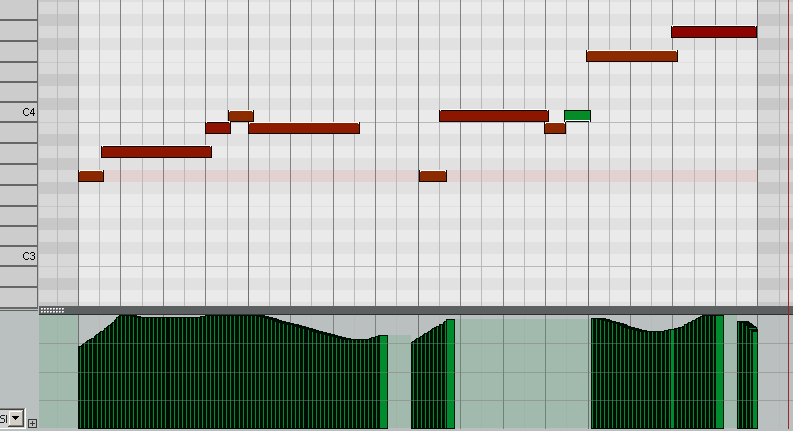
Figure 4.41
This part repeats for the first half from the previous melody, and then adds some modifications, instead of using C, D, C notes, we use C, B, C, and then go for F and G notes.
Let’s move on.
Create a new track for “Trumpets”, group it in Brass section, and load trumpets instrument. I’m using trumpet ensemble from CineBrass CORE. Create a midi box for bars 26-29. We’ll add trumpets only here, because we’re heading towards the finale, thus adding more instruments to give our music more power.
Figure 4.42 shows the melody for trumpets, which is exactly like the previous melody for horns. We’re actually doubling the horns here, but an octave higher.
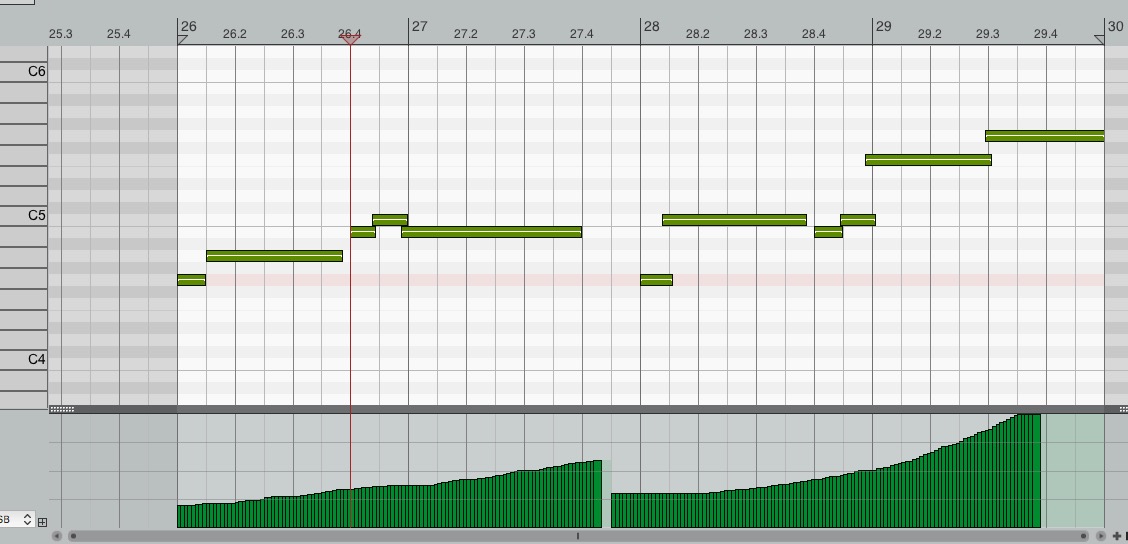
Figure 4.42
Again, I’m editing mod wheel control. And all of this is just doubling the french horns melody. Doubling lines is a common orchestration technique.
Create another new track, group it with Brass, and load tuba instrument from Kontakt Factory. Set articulation to sustain. Copy the trombones part from bars 22-29, then open the midi editor and move tuba part an octave lower, into C1-C2 region. No need for pictures now, we’re just copying another element.
Percussion
It’s time to improve our percussion section. For now, we just had some basic rhythm. It’s time to add more instruments, some cymbals, some percussion in higher registers and so on.
Create a new track and group it with Percussion section. Load “Snare drum ens” from Kontakt Library (it’s in the VSL Percussion), or any other snare drum patch. Add a midi box in bars 22-29 and open the midi editor.
Create a new pattern for snare drums like on figure 4.43 (note: I’m showing only bars 22-25 here).
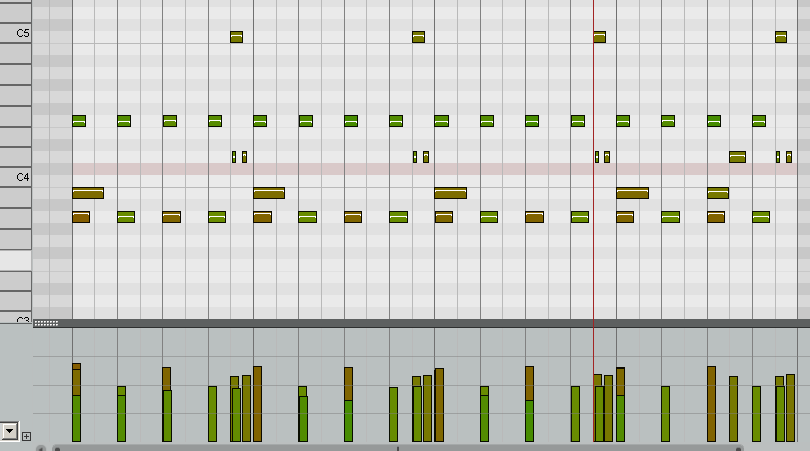
Figure 4.43
We’re actually doubling the previous drums part, with the exception that we’ve added additional rhythmic elements on notes A3, F4 and C5 (your instrument may require different notes to sound good). F4 and C5 are not hits, but snare drum “rolls”, which adds a nice element to the entire percussion.
Create another track for Percussion, and load Bass Drum from VSL Percussion. Create a midi box for bars 22-29 and create a very simple pattern (again, figure 4.44 shows bars 22-25).

Figure 4.44
Bass drum is just that, it’s a bass drum. With it, we’re strengthening the main beat of the track. We have single hits on bars 22 and 23, and two hits per bar 24 and 25. Make sure to repeat this pattern on bars 26-29.
Duplicate the snare drum track from our Percussion section, but delete all midi boxes. Create a new midi box for bars 9-12 – way earlier before the finale. Open midi editor, and create a pattern.
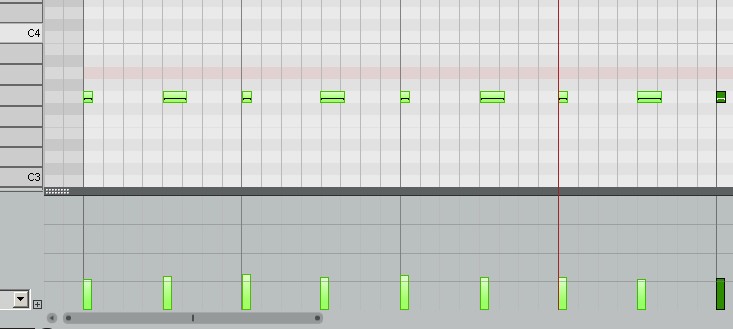
Figure 4.45
Figure 4.45 shows a simple pattern for bar 9th. Copy it to other 3 bars.
Now copy the entire section 9-12 of this snare track to bars 13-16, and open the new pasted midi box the midi editor. Yes, we’re still working on the same track. We’re going to modify this pattern further, like on figure 4.46.
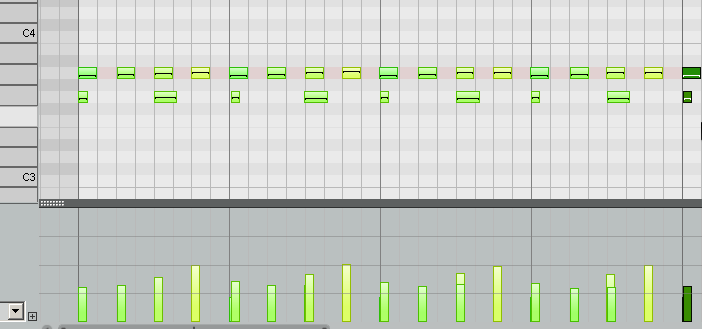
Figure 4.46
Again, figure 4.46 shows the pattern for single bar, 13, so copy it to other three bars.
Finally, copy the 13-16 section into bars 17-20, 22-25 and 26-29. That completes the drums patterns.
Cymbals
Let’s add some basic cymbals now. Create a new track, “Cymbals”, in our Percussion section, and load Cymbals from “Orchestral percussion” in Kontakt Factory. Or use any other cymbals patch. In this subchapter I will show you exactly where to place the notes for cymbal rolls and risers – this way the main “hit” or highest point of the cymbal roll can be heard on a beat. When using other patches, you have to figure it out on your own where to start the note so that it’s highest point is on the beat.
Create a long midi box from bars 12 to 31. We’re going to add only two notes, C4 and C2. Take a look at figure 4.47.
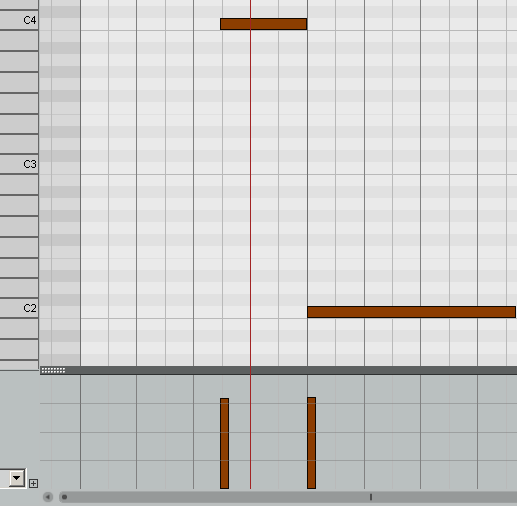
Figure 4.47
The C4 cymbal acts as a riser, and the C2 cymbal acts as a hit. It’s a simple way to create a nice cymbal effect. We’re going to add these notes in few places.
Add C4 before bars 13, 17, 22, 26. Like on the figure 4.47, the C2 is placed right before bar 13, and the next note, C2, starts at the beginning of the bar 13.
Figure 4.48 shows how long the C4 note should be in case of Kontakt Factory patch:
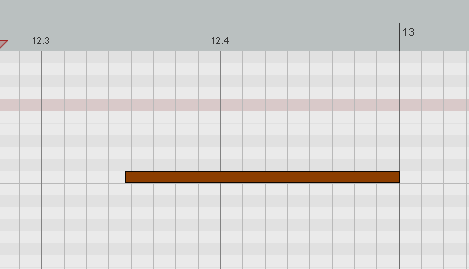
Figure 4.48
C2 should be almost an entire bar long. Place them on bars 13, 17, 22, 26.
Then, add F2 note (one bar long) on bars: 15, 19, 21, 24, 28.
Place E2 on bar 30, one bar long.
This is what the bars 12-30 will look like on our cymbals track.
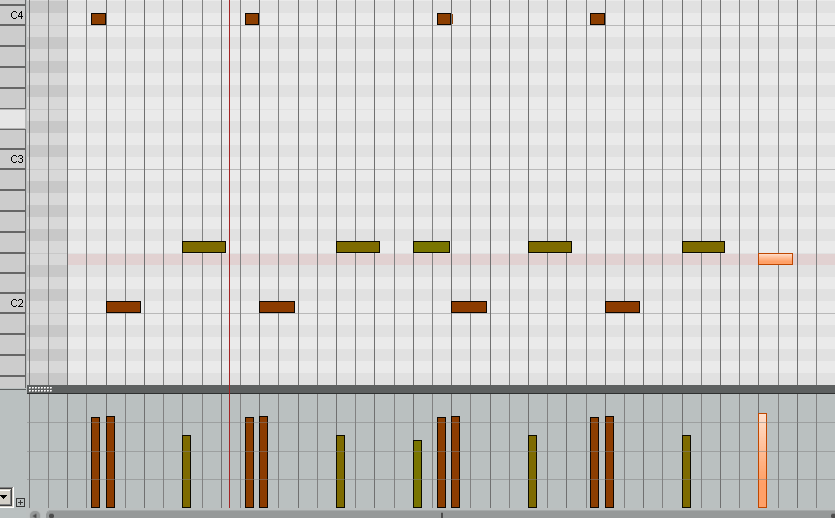
Figure 4.49
Set proper velocities. If you got lost, refer to the MIDI files for this guidebook. Some libraries have different cymbal risers and hits, sometimes you can use WAV files and make things easier.
Triangle
A gentle touch in the higher register now. Create a new track for Percussion section, and load a triangle patch. Add two simple notes to bars 22-25 (on bars 22 and 24):

Figure 4.50
Copy this section to bars 26-29. That completes our percussion section.
Choir
Choirs are a very important element of epic genre.
For this track, I’m going to use Strezov’s Storm Choir 1. It’s an affordable yet powerful choir.
Create a new group, “Choir”, and the first track, “Women 1”, for which load “Women Marcatos” from Storm Choir 1 library. This is an example of an instrument, in which you control articulation through different patches, and not by controls in the instrument’s interface.
Create a midi box for bars 22-31. It’s a larger one.
We’re going to copy the French Horn melody track here. Notice that I have doubled the A note in the 30th bar. This is the A note of our tonic chord, which ends up the entire track. When coping, make sure the notes do not overlap each other. You may want to shorten all of them. We don’t want any legato in this case.
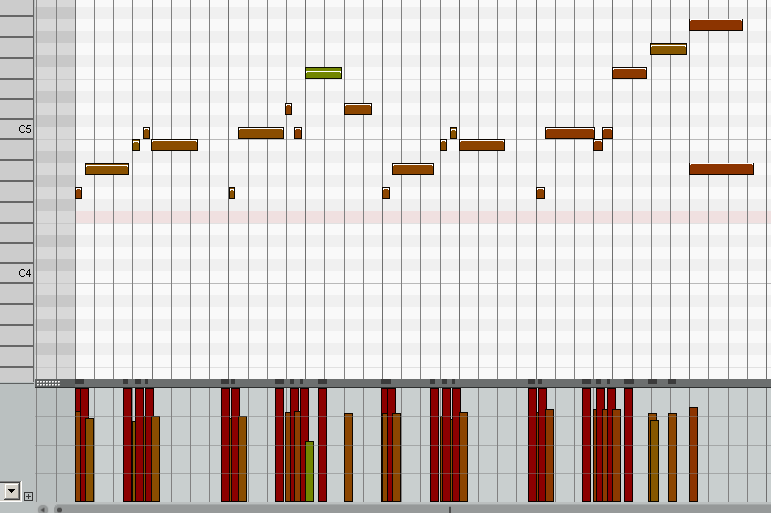
Figure 4.51
Now, let’s add keyswitches. Basically, a keyswitch is a note on the midi grid that makes no sound, but it acts as a control element to switch things. For example, some keyswitches can change the articulation of the instrument, or in case of sampled choirs, they are used to change the vowel. We place the keyswitch before the note we want to change, so that the sampler has time to react.
Figure 4.52 shows our keyswitches for Storm Choir:

Figure 4.52
Other libraries will be using other keyswitches, so refer to library’s manuals.
Now, double the Women 1 track, rename it to Women 2, and delete all midi boxes. We want a fresh start to create this for bars 22-29. Add these notes.
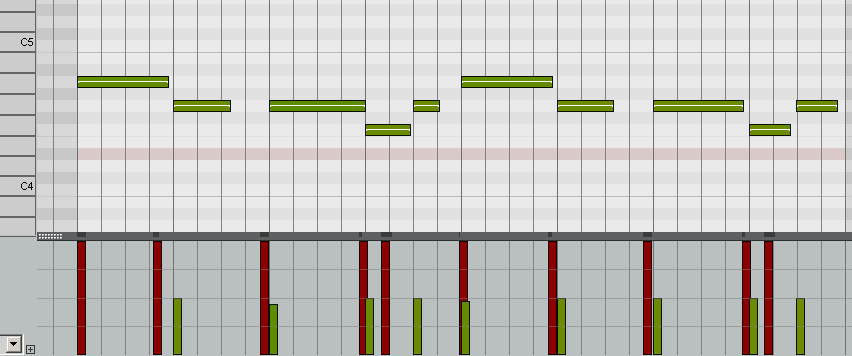
Figure 4.53
This is a slightly modified bass line like the one we’ve used for our cellos.
It’s time for another key switching for Women 2 like on figure 4.54.
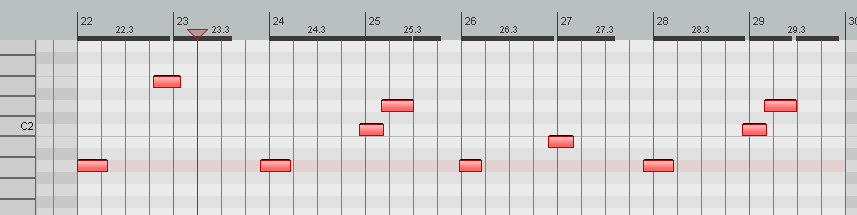
Figure 4.54
Now, duplicate Women 2 track, rename it to Men, and replace the patch to Men Marcatos. Open the midi editor for this track and move all the notes (except key switches) an octave lower, between C3 and C4. The keyswitches should remain unchanged.
Now we have our choir section ready.
FX Elements
It’s time for final touches. We need to add some FX elements for our track. This means some risers and some impacts. What are these? Basically, these are prerecorded or artificially synthesized short sounds, a couple of seconds each, that are used as special sound effects in your composition. Trailer music often uses these elements.
For example, risers can be 5 or 15 seconds long, they slowly build up volume and tension, and this can be very useful in some genres of music. Impacts are similar to risers, but are a lot shorter and ends up with a hit. They can support your percussion section. There are also other elements, like hits or brams, but we won’t use all of them here.
FX are not only used to create tension. Some sounds, like impacts or hits, add energy to the percussion section, and other FX elements can help you blend various parts of the track with each other, serving as transition elements. For the purpose of this track, we’ll use FX elements that can be downloaded for free. Three layers of such FX elements will be enough.
I’m using Free Trailer Sounds by Generdyn. You can download this trailer freebie from AudioImperia website here: https://www.audioimperia.com/collections/free-stuff/products/epic-trailer-sounds-produced-by-generdyn-freebie
I suggest downloading this package, since it’s free and explaining this kind of FX elements would be difficult otherwise.
Create a new group of instruments and call it “FX”, then create three separate tracks and load Kontakt for each of them.
I’m loading WAV files directly into Kontakt. For me this is a simple way to modify pitch and speed of the WAV sound. Some people will prefer to load WAV directly as sound into their DAW, and that’s great, too. If you’re going to use WAV files directly, you will have to figure out their placement yourself, so that they fit the entire track. That means you need to listen to the original sound as solo, and notice how it builds up and where some of the interesting elements are located.
For example, if I have a riser sound, I want to listen to an entire file and figure out where the final “hit”, the loudest and most energetic element is located, so that I can later move the riser sound left or right to match the transition of my musical elements. In case of hits or impacts, I want to find out where the actual impact happens, so that I can place it at the same time when my percussion hits.
All right, let’s add some FX elements.
Hits 1
Let’s make the first FX track, call it “Hits 1” and add Kontakt to this track. Notice that Free Trailer Sounds do have a standard NKI patch for Kontakt, but I’m loading the WAV files from the “Samples” folder instead.
Load Hits_002_GDYN from the free trailer sounds library.
Now that the WAV is loaded to Kontakt, we can add a note in our midi box that will have a proper pitch and length.
Place a note on C4 on bars 21-22, like this:

Figure 4.55
The length of this note is set this way, because now the sounds fits the drum hits nicely, and doesn’t end abruptly. Again, you can place the note somewhere else, but then you would have to figure out how it fits yourself. The same goes for using original WAV files loaded directly into your DAW.
Place this note in similar way on bars:
- 21-22
- 23-24
- 25-26
- 27-28
- 29-30
Hits 2
Copy the first Hits 1 track, rename it to Hits 2, delete the previous WAV and load HITS_003_GDYN. Also, delete old MIDI items and create a new one.
Now, add C4 notes in the following way:
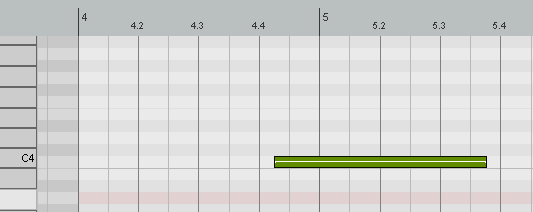
Figure 4.56
Do this on bars:
- 4-5
- 6-7
- 8-9
- 10-11
- 12-13
- 14-15
- 16-17
- 18-19
Risers
Let’s call one of the tracks “Risers”. Create it, load Kontakt and load a WAV file: RISERS_001_GDYN.
Add the first riser on the bars 3-5, on a note C5.
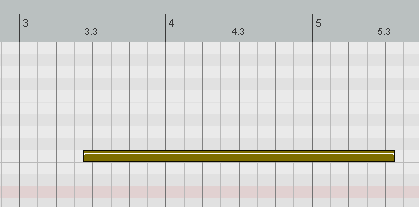
Figure 4.57
Notice how I placed it. It starts before 3.3, and goes a bit after 5.3. This way, on this particular note, C5, the sound’s length is set nicely. It rises, then on the 5th bar we have a drum hit, and then the riser slowly fades out.
Add this riser in similar way in bars:
- 3-5 (so you actually start a bit before 3.3)
- 11-13 (start a bit before 11.3 etc.)
- 19-21
- 24-26
- 28-30
We have enough FX elements now.
Final Cadence – Bars 30th and 31st
Any track, any piece of music, should (usually) end with emphasis on the tonic note, and tonic chord. The ending is called “cadence”. There are exception, of course, but this is a general rule for beginners.
This provides us with the feeling of completion. Without such clear cadence, way of ending the track, we would feel discomfort. Of course, sometimes the composition intends to make the listener uncomfortable – this is often used in soundtracks for films and games, as it fits what’s happening on the screen. If this is the kind of music you’re making, then you can end the piece without such clear cadence.
For this track, we will create a classic cadence.
It’s time to work on the 30th bar, our final chord that finishes up the entire track. We already have a choir there and some FX elements, as well as cymbal and triangle.
By now you should know the drill, so I will keep it simple.
Let’s add another bar for piano track, bar 30th:
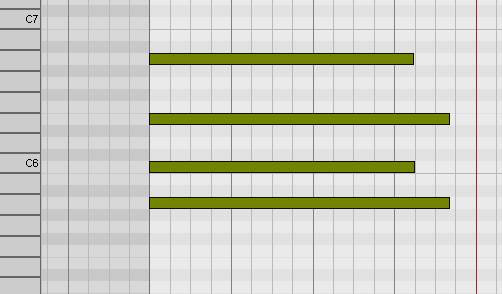
Figure 4.58
For Violins 1st, bar 30th,:
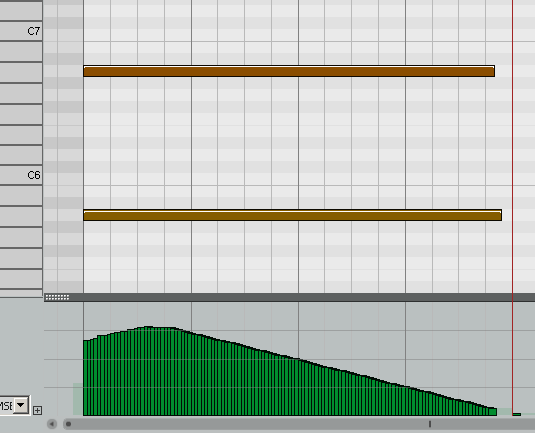
Figure 4.59
Shape the expression (or modulation) nicely, so that the strings fade out.
The same goes for Violins 2nd:
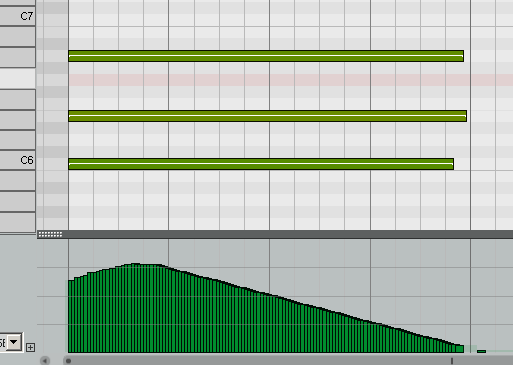
Figure 4.60
And our violas track:

Figure 4.61
This time, we can change the velocity. Notice that the last note, A, starts the 31st bar.
Our cellos are next:

Figure 4.62
Add a single A2 note on our staccato contrabass track in grid 30th.
Add longer note with expression on long contrabass track:
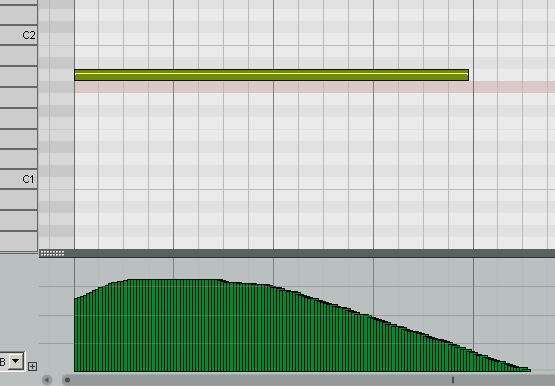
Figure 4.66
Add the following notes on our flutes track on the 30th bar.
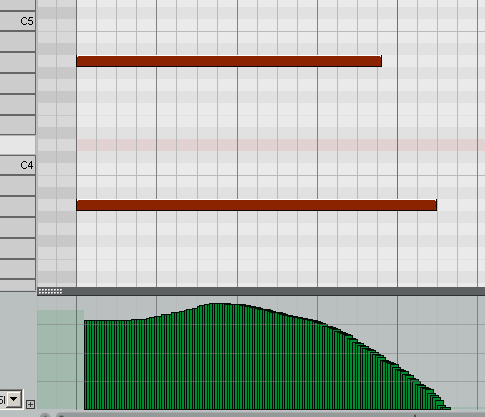
Figure 4.63
French Horns track, with mod wheel or expression, on note A3:
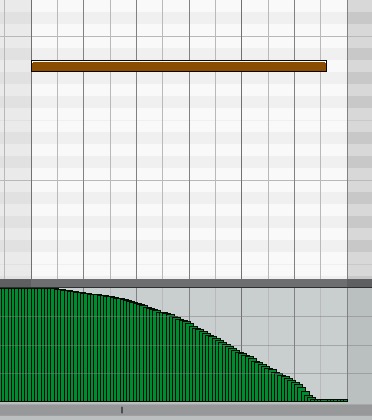
Figure 4.64
Add A5 and A4 for 30th bar on our trumpets track (no image).
And add some trombones for the entire 30th bar:

Figure 4.65
Add A2 note for 30th bar on our Tuba track. No picture needed here, right?
Humanization
Now, remember when we talked about the humanization of the notes? Make sure you do this now for all the tracks and midi items. I mention this now, but you should remember about this all the time, so you don’t have to go back and humanize hundreds of midi items later.
Anyway, that’s it, now we have composed a track! I realize this kind of course can be difficult to follow, but hopefully you’ve ended up with your very own orchestral track.
It’s time for post-processing – I’m going to teach you the basic mixing process. This will be explained in a short series of tutorials, “How to Mix Orchestral Music”, so consider this course to be finished, and mixing course to be a free DLC :).
How to Move From Here?
You followed my tutorials and you’ve made your very own orchestral track. How to move from here? How to get from this particular simple track to music of Thomas Bergersen, or great Hollywood composers? How to create better, more realistic orchestral pieces? The answer is made of two things:
- Learn
- Practice
Everything that is needed is explained in this series of tutorials – composition and orchestration. All you have to do is to improve upon this basic knowledge, this foundation. This means reading about composition, orchestration, counterpoint, voicing and so on, and practicing by creating more tracks, paying greater attention to smallest of details, learning how to orchestrate things, how to layer different instruments together. With this basic knowledge, further sources such as tutorials or video courses will be easily understandable to you.
Don't forget to become a fan on Facebook and subscribe to new posts via RSS or via email.